ELEMENTARY PRINCIPLES
DIRECT CURRENTS
SECTION I-B
CURRENT-RESISTANCE-VOLTAGE
OHM'S LAW
SERIES RELATIONS
CIRCUITS WITH MORE THAN ONE SOURCE OF EMF
ACTION OF CONDENSERS IN DIRECT CURRENT CIRCUITS
CURRENT-RESISTANCE-VOLTAGE
From our every-day contact with electrical appliances in the home-door bells, electric lights, etc. we all have a general idea of what electricity will do in the simpler forms of circuits. In this Section we shall study the action of electrical currents which flow continuously in a single direction and are known as direct currents. We shall use, insofar as possible, illustrations from the telephone plant with which we are all familiar. Also, to aid us in picturing in our minds some of the things discussed, we shall make use of the simple analogy between the flow of water through pipes and the flow of electricity along conductors.

Fig. 1
Fig. 1 shows two tanks, A and B, connected by a pipe C. Tank A has water at a higher level than B; therefore, there is a difference of pressure, and so long as this exists there will be a flow of water through C. The amount of water which will flow through C in a given time will depend upon the difference of pressure between the two tanks and upon the resistance with which the pipe opposes the flow of water through it. As the relation between the driving pressure, the opposing resistance and the resulting flow is definite and exact, this relation can be expressed mathematically if we have units in terms of which to measure the amount of each of these three quantities. For this purpose we can, as is commonly done, express the difference in pressure between the two tanks in pounds per square inch. Also, if a water meter were placed in the pipe, it would record the amount of water through it in terms of cubic feet, or gallons, or some other unit of quantity, so that, by timing the meter with a watch, we could determine the amount of water (in gallons, let us assume) which would flow during some unit of time, say, one second. We should then be able to express the rate of flow, or the current, in terms of gallons per second; i.e., one gallon per second is the unit of current corresponding to unit quantity of one gallon and unit time of one second. Finally, having selected a unit of pressure and a unit of current, we could define the unit of resistance to be that amount of resistance (as determined by the size, length, etc., of the pipe) which would allow a rate of flow of exactly one unit of current under the action of one unit of pressure.
In electrical circuits we have to deal with quantities which are analogous to the pressure, amount, current and resistance just discussed; and for each of these electrical quantities there is a unit to which has been given a name commemorating a famous early investigator of the science of electricity. Electric pressure is called "electromotive force," meaning, of course, the force or pressure which causes electricity to move or flow; but we most commonly refer to it as "voltage," a term which, as will shortly appear, is derived from the name of its unit. The term "emf" (pronounced by spelling out), which is the abbreviation of electromotive force, is also quite commonly used instead of voltage. In the preceding analogy we chose one pound per square inch as the unit in terms of which to express water pressure; the unit of electromotive force, or voltage, is one volt.
We also chose one gallon as the unit in terms of which to express the amount or quantity of water. Quantity of electricity is usually spoken of as the amount of "electric charge"; the unit in terms of which this is ordinarily expressed, i.e., unit electric charge, is one coulomb. With electric charge, however, we shall be but little concerned until we take up the action of condensers in alternating current circuits, in Section II: in our present study of direct currents we shall be interested, not in electric charges themselves, but in their rates of flow, i.e., in electric currents.
There is no commonly used special term for electric current; ordinarily it is spoken of merely as the "current"; but we do have a name for the unit of electric current. Having chosen one gallon as the unit of quantity of water, and one second as the unit of time, we naturally expressed rate of flow or current of water in gallons per second because there is no special name for unit current of water. In like manner, it would be entirely correct to express electric current in terms of coulombs per second. Indeed, this is exactly what is done, except that the unit current of one coulomp per second is called one "ampere." The abbreviation of ampere is amp. For convenience, currents smaller than an ampere are often expressed in milliamperes, commonly abbreviated "mils," one milliampere being one one-thousandth part of one ampere. To convert amperes into milliamperes, multiply by 1,000: e.g., .032 amp = 32 mils.
Electric resistance, the opposition which a conductor offers to the flow of electricity, is simply called "resistance." The unit of resistance to an electric current is one "ohm." By definition, a circuit has a resistance of one ohm if it permits a current of one ampere to flow through it under the action of an emf of one volt. This one-to-one relationship between the volt, the ampere and the ohm is shown graphically by the circuit in Fig. 2.
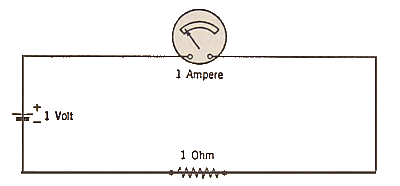
Fig. 2
OHM'S LAW
In the case of the flow of water it was stated that a definite relation existed between the driving pressure, the opposing resistance and the resulting rate of flow, and that this relation could be expressed mathematically. Exactly the same sort of relation exists between the voltage, resistance and current in electrical circuits. We have seen above that the units of these three electrical quantities have been so selected that an emf of one volt, applied to a circuit whose resistance is one ohm, will cause a current of one ampere to flow. Carrying this relationship a step further, we may state that current equals voltage divided by resistance, or
| 1 | 2 | E | 4 | 5 | 6 | 7 |
| I | = | |||||
| R |
where I is the current in amperes, E is the emf in volts and R is the resistance in ohms. The foregoing general relation is known as "Ohm's Law." Expressed another way, the resistance is equal to the voltage divided by the current, or
| E | ||||||
| R | = | |||||
| I |
The third way of expressing this relation is to say that the voltage equals the current times the resistance, or
| I | ||||||
| E | = | |||||
| R |
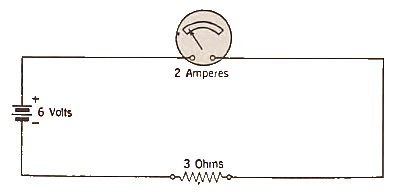
Fig. 3
We can illustrate these three forms in which Ohm's Law may be stated by examples from the circuit in Fig. 3:-To find the current flowing in this circuit of 3 ohms resistance with a 6-volt battery, we have
| E | 6 | |||||
| I | = | = | = | 2 apmeres | ||
| I | 2 |
| E | 6 | |||||
| R | = | = | 3 ohms | |||
| I | 2 |
To find the voltage which will cause a current of 2 amperes to flow through this circuit of 3 ohms resistance, we have
| E | = | IR | = | I x R | = | 2 x 3 | = | 6 volts |
The different methods� of expressing Ohm's Law are given in the following table:
Ohm's Law
| Voltage | ||
| Current | = | |
| Resistance |
| E | Volts | |||||
| I | = | Ampers | = | |||
| R | Ohms |
E I = R Ohm's Law Voltage Current =---- Resistance Resistance� = Volts Amperes = --� Ohms Voltage Current E Volts R = - Ohms = --- I Amperes Voltage = Current X Resistance E = IR Volts = Amperes X Ohms
Current Webmaster comments: (October, 2012)
Now that you are thoroughly confused....
I have always had difficulty in remembering the specific variations of Ohm's law. I have no problem with the concept just the arrangements of formula configurations.
In High School I had a Geometry teacher that solved the problem for me.
Draw a circle.
Draw a line dividing the circle into a top and bottom half.
Now divide the bottom half into quarters with a vertical line.
In the top half, place a E for electromotive force or voltage.
In the bottom left quadrant enter an I for amperage.
In the bottom right quadrant enter an R for resistance.
Now, mentally cover the variable that you are trying to find and the other two variables will fall into the proper positions in your formula.
I think of this in my head as, "E over I R" which I can remember fairly easily.
While it doesn't apply to this course, you can do the same with Watt's law by thinking "P over I E" where the P = power or watts.
SERIES RELATIONS IN DIRECT CURRENT CIRCUITS Let us again refer to our water system analogy to illustrate a series circuit. We will assume that pipes a, b and c in Fig. 4 are all of one diameter and are joined in series by perfectly smooth connections to form a line through which the water can flow from 1------- A 1------- a b c B J [ J l::=:j Fig. 4 Page 13 A to B. If a is three feet long, b three feet long and c two feet long, we can then consider the total resistance to the flow of water to be the same as t:t9.t of one pipe whose length equals the sum of these three lengths, or 8 feet long. The same relation holds true for electric circuits where the current flows through a series of resistances :-The combined resistance of two or more resistances connected in series is equal to the sum of the individual resistances. To illustrate the principle just stated, let us take an example from one of the simplest of practical telephone systems. This simple system, shown schematically in Fig. 5, consists of two magneto telephones connected together by two wires. In each of these telephones direct current is supplied through the Fig. 5 transmitter by a battery of dry cells connected in a local circuit comprised of the battery, the transmitter, one winding of an induction coil and the connecting leads, all joined in series as indicated. This type of circuit is called a simple series circuit. Let us assume the resistance of the transmitter to be 40 ohms�, the resistance of the coil winding to be 5 �The resistance of transmitters varies over a wide range, its value depending upon the type of transmitter and upon the supply current through it. ;Forty ohms is merely a representative value assumed for purpose of illustration. Page 14 �ohms, and the resistance of the connecting leads to be so small compared with the foregoing values that it can be neglected in practical computations ; and let us further assume the transmitter requires a supply current of .1 ampere. The question we wish to answer is : What battery voltage will be needed to furnish this required supply current 1 In applying Ohm's Law to this question we mu� st first determine the combined resistance of the local circuit by summing the resistances of its individual parts ; from the above assumed values this total resistance 1s found to be 40 ohms + 5 ohms = 45 ohms. Then, knowing from Ohm's Law that the voltage must equal the product of the current multiplied by the resistance, the voltage needed to supply the required .1 ampere to the transmitter through the total local circuit resistance of 45 ohms is
E = I X R = .1 X 45 = 4.5 volts. A second example illustrating the principle of combining resistances connected in series is presented by Fig. 6, in which is shown the path of the direct current supplied from the central office battery to a common battery loop and subset. Starting at the battery, we trace this series circuit through Induction Coil Fig. 6 Page 15 one winding of the repeating coil, a heat coil, one side of the cable pair, a winding of the induction coil, the transmitter, the other side of the cable pair, another heat coil, the supervisory relay, a second winding of the repeating coil, and back to the opposite side of the central office battery. Assuming the resistances of the various elements in the circuit to be as shown in the schematic, the combined resistance of this battery supply path is the sum of the following : Repeating coil winding Heat coil One mile 22-gauge cable conductor Induction coil winding Transmitter One mile 22-gauge cable conductor Heat coil Supervisory relay Repeating coil winding Total Resistance 21 ohms 3 " 86 " 15 " 56 " 86 " 3 " 9 " 21 " 300 ohms The emf acting upon this circuit whose total resistance is 300 ohms, is 24 volts. Applying Ohm's Law, the supply current flowing in this circuit is found to be
E 24 1 =- =- = .080 amp. R 300 Thus far in these examples pertaining to series circuits we have concerned ourselves solely with the circuit as a whole; the circuit elements have been considered only as regards their contribution to the total resistance; and, in applying Ohm's Law, we have dealt with total circuit resistance and with the battery voltage. We shall, however, also have frePage 16 quent need to apply Ohm's Law to individual circuit elements. Let us see what sort of information can be obtained by so doing. Suppose we were to connect a voltmeter across the transmitter in Fig. 6, as is indicated in Fig. 7. A Fig. 7 voltage such as would thus be measured is called a drop in potential or a voltage drop-in this particular instance, the potential or voltage drop across the transmitter. By Ohm's Law the voltage drop across any given circuit element equals the resistance of that element multiplied by the current through it. If we were to measure the drop across each of the circuit elements in Fig. 6, and were to add all these drops together, the total voltage so obtained would equal the voltage of the central office battery supplying the circuit. But the resistance of each circuit element is known, and the current in the circuit has already been found to be .080 ampere; consequently these potential drops and the total voltage can also be computed by the Ohm's Law relation I X R = E. The values thus obtained are: Repeating coil winding Heat coil One cable conductor Induction coil winding .080 X 21 = 1.68 volts .080 X 3 = .24 " .080 X 86 = 6.88 " .080 X 15 = 1.20 " Transmitter One cable conductor Heat coil Supervisory relay Repeating coil winding Total Page 17 .080 X 56 = 4.48 " .080 X 86 == 6.88 " .080 X 3 = .24 " .080 X 9 = .72 " .080 X 21 = 1.68 �' 24.00 volts Likewise, had we obtained the above potential drops by measurement, and had we also measured the .080 ampere current, we could have used the Ohm's Law relation E -:- I = R to determine the resistances of the circuit elements: Repeating coil winding Heat coil One cable conductor Induction coil winding Transmitter One cable conductor Heat coil Supervisory relay Repeating coil winding Total 1.68 -:- .080 = 21 ohms .24 -:- .080 = 3 " 6.88 -:- .080 = 86 " 1.20 -:- .080 = 15 " 4.48 -:- .080 = 56 " 6.88 -:- .080 = 86 " .24 -:- .080 = 3 " .72 -:- .080 = 9 " 1.68 -:- .080 = 21 " 300 ohms Finally, knowing the resistances of the circuit elements, and measuring the voltage drop across each, we could use the Ohm's Law relation E -:- R = I to demonstrate that the direct current at any instant is the same in all parts of a series circuit- Repeating coil winding Heat coil One cable conductor Induction coil winding Transmitter etc. 1.68 -:- 21 = .080 amp .24 -:- 3 = " " 6.88 -:- 8� = " " 1.20 -:- 15 = " " 4.48 -:- 56 = " " Page 18 CIRCUITS WITH MORE THAN ONE SOURCE OF EMF We shall now consider another important principle of electric circuits. This is the principle by means of which can be determined the current resulting when more than one source of emf is acting in a circuit. Figs. 8 and 9 show simple series circuits in each of which are two sources of emf. The two sources in 3 Ohms .--------------.o..o--------------.1 3 Ohms o..o--------------. Fig. 8 Fig. 8 are poled to act in the same direction around the circuit, whereas those in Fig. 9 oppose one another. In each of these circuits the two sources may be treated as an equivalent single source: the aiding sources in Fig. 8 are equivalent to a single source whose voltage is that obtained by adding the two voltages; the opposing sources in Fig. 9 are equivalent to a single source whose voltage equals that ob- 3 Ohms .--------------o..o--------------.Jl 3 Ohms .0 Fig. 9 Page 19 tained by subtracting the smaller of the two voltages from the larger. Illustrating the foregoing with the values shown in the schematics, the equivalent voltage in Fig. 8 is 24 + 6 = 30 volts, while that in Fig. 9 is 24 - 6 = 18 volts. The resistance of each of these circuits being given as 3 + 3 = 6 ohms, the currents can be determined by Ohm's Law. In Fig. 8 E 24 + 6 30 I = - = ---= - = 5 amp and in Fig. 9 R 6 6 E 24 - 6 18 I = - = --= - = 3 amp. R 6 6 The preceding method, in which the equivalent voltage is first determined, is a satisfactory means of computing the current due to more than one source of emf in simple series circuit arrangements ; but it does not readily apply to more complex circuits. By comparing the above values of the currents due to the two sources acting together, with the currents which would flow if each of the sources were to act alone, we are, however, led to a method by which the current due to more than one source in any type of circuit can be determined. Referring again- to Figs. 8 and 9, if the 6-volt source were not present the current due to the 24-volt source alone would be E 24 I = - = - = 4 amp. R 6 Similarly, the current due to the 6-volt source alone would be E 6 I = - = - = lamp. R 6 .As to the directions of these currents in the two circuits, the poling of the sources is such that both currents would flow in the same direction ( clockwise) around Fig. 8; but in Fig. 9 they would flow in op� / Page 20 posite directions, the 4 amperes clockwise and the 1 ampere counter-clockwise. Now, where two or more currents flow along a path at the same time, we should expect those flowing in the same direction to add and those in the opposite direction to subtract. Consequently, when both sources act at the same time, we should expect the current in Fig. 8 to be 4 + 1 = 5 amperes, and that in Fig. 9 to be 4 - 1 = 3 amperes. These values are seen to agree exactly with those already found by the equivalent voltage method, and so our expectations are confirmed. The manner in which we have just obtained these values illustrates the application, to simple series circuits, of a principle which will enable us to determine the current in a circuit in which two or more emf sources are acting simultaneously. For our purposes this principle may be stated as follows : The current at any point in a circuit in which two or more sources of emf are acting simultaneously, is equal to the net sum of the individual currents which would flow at that point if each of the sources in turn were to act alone-this net sum being the value obtained by subtracting the total of such currents flowing in one direction from the total in the opposite direction. This easily understood and frequently useful principle is known by a rather technical sounding name; it is called the "Superposition Theorem." There is, however, one restriction to be observed regarding its application; this principle is not applicable to any circuit .in which current flows through any element whose resistance varies with either the magnitude or the direction of the current through it. A carbon button transmitter is an example of an element whose resistance varies with the magnitude of the current through it, and a varistor is an example of an element whose resistance depends upon the direction of the current. : Page 21 ACTION OF CONDENSERS IN DIRECT CURRENT CIRCUITS Referring again to Fig. 6, we see another circuit which, starting from the contact of the switchhook, passes through the receiver, the induction coil, the condenser, and thence to the line side of the transmitter. If an ammeter were placed there, no direct current would be found in this circuit. This is because the condenser will not permit direct current to flow through it. A condenser consists of two conducting surfaces so separated by an insulating material that there is no electrical connection between the two surfaces. The conducting surfaces are commonly formed of metal plates or of metallic foil, while mica, glass, paraffined paper, and air are the common insulating materials. Fig. 10 shows a condenser, consisting of two metallic plates separated by air, connected in circuit with a battery and a sensitive meter. When this circuit is established electricity will flow from the battery into the condenser, where it will be stored, thereby giving rise across the condenser to a potential drop which increases as the stored charge accumulates, and which opposes the voltage producing the charging current. Consequently, as the voltage across the ..!!. Fig. 10 Page 22 condenser builds up, the charging current will decrease from its initial value until, when the condenser voltage reaches the charging voltage, the current will cease. The quantity of electricity which must be stored in the condenser to charge it up to a given voltage depends upon the capacity of the condenser, and this, in turn, depends upon the area of the plates, upon the distance between them, and upon the kind of insulating material separating them. Under ordinary conditions the charging of a condenser occurs so rapidly it may, for most practical purposes, be thought of as being completed almost instantly, after which, since the current then ceases, the circuit may be considered to be open at the condenser. There are many instances in the telephone plant where condensers are used primarily to prevent the flow of direct current. The condensers in subscriber sets are an example. These prevent direct current from flowing through the receiver or through the ringer. The action of condensers in alternating current circuits will be explained in Section II. ELEMENTARY PRINCIPLESDIRECT CURRENTS SECTION I-C PARALLEL RESISTANCES Page 23 PARALLEL RESISTANCES In the previous Section we have considered only the series circuit, i.e., the type of circuit in which all the current flows in a single path. In the telephone plant, however, we find many circuits in which the current divides between two or more paths. Such paths are known as parallel paths. To begin our study of these we again consider a water system analogy. Fig. 11 Fig. 11 shows a water system in which there are two similar paths for the flow of water from A to B. With a constant pressure maintained at A the rate of flow of water in each pipe will be the same as it would be if the other pipe were not present. Consequently the rate of flow with two pipes will be twice as great as with only one pipe; and the more pipes we add in parallel between A and B the greater will be the rate of flow. We have already learned that rate of flow equals pressure divided by resistance; hence, in any case in which the rate of flow is increased, either the pressure must have been increased or the resistance decreased, or both. In the above case we assumed the Page 24 pressure constant ; the result of placing several pipes in parallel must, therefore, have been to decrease the resistance. .--------------.1�..--------------. 24 Volts Fig. 12 Fig. 12 shows an electrical circuit of the type to which the water system of Fig. 11 is analogous. We refer to the two resistances R1 and R2 as being in "parallel" or in "multiple." With two equal paths in multiple and with a constant voltage at the battery, we shall have twice the current flow that we should. have with only one path. The combined resistance of the two equal resistances in multiple is then one-half that of either one; the combined resistance of three equal resistances in multiple is one-third ; etc. If the resistances R1 and R2 are not equal we must find some way in which to calculate the combined re- � sistance of the two in multiple. There is a simple rule by which we can compute the combined resistance of any number of resistances in multiple ; this combined resistance equals the reciprocal of the sum of the reciprocals of the individual resistances. The reciprocal of a number is, of course, "one" divided by that number. For example, the reciprocal of 3 is 1j3, the reciprocal of 12 is 1j12, etc. If we have only two resistances in multiple, we can simplify this rule: the combined resistance of two resistances in multiple is equal to their product divided by their sum. Page 25 To illustrate the preceding, let us assume the value of the resistances in Fig. 12 to be R1 = 6 ohms ' and R2 = 12 ohms as indicated in Fig. 13. Then, applying the first of the above rules, the sum of the reciprocals of 6 and 12 is found to be 1 1 3 - + - = - 6 12 12 and the reciprocal of 3j12 is 3 12 12 1 +- = 1 X -=-= 4 ohms 12 3 3 The second or simplified rule will, of course, lead to the same value 6 X 12 72 ---=-=4 ohms 6 + 12 18 \V e have now determined the combined resistance of the multiple paths from a to b in Fig. 13 to be 4 ..!!.. 24 Volti a 6 Ohms f .. b Fig. 13 12 Ohms<'.. ..? ohms. This circuit can, therefore, be treated the same as it would be if the points a and b were connected by a single path of 4 ohms as shown in Fig. 14. If we have to deal with more than two paths in multiple, we may either use the first rule to deterPage 26 -. 24 Volts 4 Ohms J,.]; b Fig. J4 mine their combined resistance, or we may determine this by simplifying the circuit, step by step, by means � of successive applications of the second rule. For example, Fig. 15 shows a circuit in which there are a b c ( "'? .. ..24 Volts 7 Ohms .. 9 Ohms<;. 3 Ohms:: ? ? Fig. 15 three paths, a, b, and c, in multiple. As the first step in simplifying this circuit let us apply the second rule to determine the combined resistance of paths a and b; we obtain axb 7X9 ---= ---= 3.94 ohms. a + b 7 + 9 Consequently, we can consider paths a and b to be replaced by a single path of 3.94 ohms in multiple with path c. The combined resistance of 3.94 ohms in multiple with 3 ohms is, therefore, equal to the Page '1:1 combined resistance of all three paths. Again applying the secontl rule, this value is found to be 3.94 X 3 ---= 1.7 ohms. 3.94 + 3 If there were a fourth multiple path in Fig. 15 we would combine its resistance with the 1.7 ohms, etc. The term "conductance" is used to express the facility with which a conductor allows current to flow; conductance and resistance are, therefore, merely opposite aspects of the property which determines how well or how poorly circuit elements conduct electricity. The unit of conductance is one mho, a term obtained by spelling ohm backward. By definition, one mho is the conductance of a one-ohm resistance. If we halve resistance, conductance is doubled; if we reduce resistance to one-third, conductance is tripled; etc. Consequently, since the conductance of a one-ohm resistance is one mho, the conductance of a one-half ohm resistance is 2 mhos, the conductance of a one-third ohm resistance is 3 mhos, etc. In other words the conductance of any circuit element in mhos is the reciprocal of its resistance in ohms, and vice versa. Also, just as the combined resistance of circuit elements connected in series is the sum of their individual resistances, just so is the conductance of paths connected in multiple the sum of the conductances of the individual paths. To illustrate, the conductances of the three paths in Fig. 15 are 1j7 mho, 1j9 mho and 1j3 mho, respectively, and the combined conductance of these paths is 1 1 1 37 - + - + - = -mho. 7 9 3 63 Furthermore, the reciprocal of this combined conPage 28 ductance must equal the combined resistance of the paths in multiple-this value we find to be 37 63 63 1 -7- - = 1 X - = - = 1. 7 ohms. 63 37 37 This result agrees, of course, with the value already obtained by successive applications of the second rule for evaluating the combined resistance of multiple paths; and the manner in which it was arrived at explains the first rule. A very familiar example of parallel paths in the plant is the supervisory relay winding which consists of two windings in multiple-usually represented as shown in Fig. 16. Winding a is known as a nona b Fig. 16 inductive winding and winding b as an inductive winding. As will be explained more fully in a later Section, winding a has no effect on the relay action, but is merely to furnish a path for the voice current. The resistances of the two windings being approximately equal, direct current divides about equally between them. If winding b becomes opened the resultant failure of the relay to operate makes this trouble an easy one to locate. If winding a becomes opened, however, the talking current will be greatly weakened, but the relay will continue to function, thus making the cause of this trouble less easy to detect. One symptom of the latter trouble would be sticking of the relay because all the current would Page 29 then pass through b winding and would, therefore, produce a very strong magnetic pull. The multipled cable conductors comprising the battery feed for private branch exchange boardsknown to all of us as P.B.X. boards-furnish another familiar example of parallel paths. P.B.X. boards require a voltage across the bus bars sufficient to operate relay and lamp signals and to supply current to the station transmitters. We can supply this by putting a storage battery at the P.B.X. (usually not economical for small boards) , or we can supply the voltage over cable conductors from the central office battery. The requirement is that at all times, regardless of the load on the switchboard, there be sufficient voltage to operate the board properly. Let us assume the lowest permissible voltage at a given P.B.X. to be 14 volts, and the minimum central office battery voltage to be 22 volts ; this will allow a drop in voltage over the cable conductors of 8 volts. We learned in Section I-B that the drop in voltage over any part of a series circuit is dependent upon the current flowing iri the circuit. If we know the maximum current requirement for the P.B.X., we can easily determine the combined resistance of the group of cable conductors to give a voltage drop of 8 volts. Let us assume a maximum current drain of 1 ampere ; then E 8. R =- =- = 8 ohms. I 1 Fig. 17 shows the schematic of the battery feed for a P.B.X. board at B, located 1% miles from the central office, with only 22-gauge cable available. The loop resistance of a single pair of 22-gauge cable conductors 1% miles long is 256 ohms, but as determined above, the loop resistance of the battery Page 30 II 22 Ga. Cable Conductor ..24 Volt� r--" Mil..--1 A # 22 Ga. Cable Conductor � Fig. 17 feed must be not more than 8 ohms. From this we see we shall require a great number of conductors in multiple. We have already learned that two conductors of the same gauge in mulk,iple have one-half the resistance of one conductor, three conductors of the same gauge have one-third, etc. Therefore, the combined resistance of any number of similar conductors in multiple equals the resistance of one conductor divided by the total number. We can reverse this and say that the resistance of one conductor, divided by the combined resistance desired, will equal the number of conductors required. In the example above we require a lead of 8 ohms made up of a number of conductors in multiple, each of which has a resistance of 256 ohms. By the rule just stated the number of conductors which must be connected in multiple in this case can be found by dividing 256 by 8. The result is 32. Hence 32 conductors will be required in each side of the leada total of 32 cable pairs for the complete lead. The cost of 32-cable pairs one and one-half miles long would, however, be very high ; if possible we must find some cheaper way to accomplish our purpose. Fig. 18 is a simplified sket-ch of this circuit with an Page 31 A Fig. 18 equivalent resistance unit of 4 ohms substituted for the 32 conductors on each side of the line. In Fig. 19 we have replaced one side of the line by the earth which is assumed to have no resistance. By this Fig. 19 means we not only save all the conductors in the side of the lead replaced by the ground circuit, but also, as we can now allow twice as much resistance in the other side, we shall save half the conductors in that side as well. The scheme in Fig. 19 will, therefore, require but one-quarter as many conductors as that in Fig. 18, viz., 8 cable pairs instead of 32. The "A-board" cord circuits are a good example of a large number of circuits in multiple. One cord circuit requires only a small current, say, .15 ampere ; but when we have a large number of cords in service simultaneously, as there would be in a large office, the total current may amount to several hundred amperes. Page 32 In the telephone man's work it often becomes necessary to build up a circuit which will have a specified resistance, and in many cases a single resistance unit of the desired value is not available. If, however, we have an assortment of resistance units we may be able to combine two or more of them to give the value required. l ..!!!.24 Volts 25 Ohms Fig. 20 Let us suppose, for example, that we wish to build up the circuit in Fig. 20, but that the lowest resistance unit in the assortment at hand is a 30-ohm unit -how are we to obtain the required 25 ohms f' Noting that the desired resistance is less than the smallest unit available, we remember that the combined resistance of paths in multiple is less than that of any of the individual paths ; consequently we know we shall have to connect some resistance in multiple with the 30-ohm unit to secure the needed l ower value. We also know it is easier to deal with parallel paths in terms of their conductances than in terms of their resistances: Hence we say we wish to determine the value of the conductance which it will be necessary to connect in multiple with (i.e., add to) the available 1j30 mho to obtain the required 1j25 mho. This added conductance we find to be 1 1 1 - - - = -mho. � 25 30 150 But 1j150 mho is the conductance of a 150-ohm resistance. Consequently, a resistance of 150 ohms conPage SS nected in multiple with the 30-ohm unit will provide the required 25 ohms. If we do not have a 150-ohm unit we shall have to combine other units-for example, one 30-ohm and two 60-ohm units in seriesto obtain the 150 ohms. ELEMENTARY PRINCIPLESDIRECT CURRENTS SECTION I-D SERIES AND PARALLEL RESISTANCE COMBINATIONS IN DIRECT CURRENT CIRCUITS Page 34 SERIES AND PARALLEL RESISTANCE COMBINATIONS In previous discussions we have considered only the simpler forms of circuits, viz., circuits in which the resistance is either all in series in a single path or is in two or more parallel paths. The circuits in the telephone plant, however, are usually made up of combinations both of series paths and of parallel paths. Such circuit arrangements are called "networks." There are some types of networks which must be so designed that one part may be varied without appreciably affecting the currents in other parts. In a common battery system, for instance, we have a vast network connected to a single source of voltage (the central office battery) , and here it is essential that we be able to change any branch or any combination of _branches without disturbing conditions at other points in the system. As the first step in our study of how this can be accomplished we shall again consider a water system analogy. Fig. 21 Fig. 21 shows a water system which illustrates a combination of series and parallel paths. This system consists of a supply tank A which maintains a Page 35 constant pressure, and a conducting pipe B and header F which supply water to a system of water motors C, D and E. If the operation of each of the water motors is to be practically independent of the others, the pressure at F must be maintained substantially constant, regardless of how many of the motors are operated simultaneously, otherwise the operation of the motor C, for example, when operated singly will be different from its operation when the other two motors are also running. To meet this requirement we would make pipe B large enough so that, if we desire to run all three motors at the same time, the pressure in F will be sufficient to insure proper speed of all three, and also so that, if motors D and E were shut down, the pressure in F would not increase enough to seriously alter the speed of motor C. The foregoing water system is a very close analogy to the P.B.X. battery feed sho..n in Fig. 22 : the supply tank A is analo-gous to the central office battery ; Fig. 22 the pipe line B corresponds to the group of cable conductors from the central office to the P.B.X. ; the disttibuting head F plays the role of the P.B.X. busbars ; and the motors C, D and E represent the circuits we wish to operate. The circuits C, D and E, Page 86 shown as simple resistances, may represent the simple line lamp circuit ; or they may represent the complete circuit from one P.B.X. extension to another P.B.X. extension or trunk, including the cord circuit. We know from experience that, if we do not have sufficient cable pairs to make up B, the voltage at F, when all the cords are busy, will be so low that the signals will be dim and the battery supply current will be insufficient to make the stations "talk up." To make clear the reason for this we shall work out an example. Example : Let us assume the elements making up the battery feed arrangement in Fig. 22 to have the following values : ( 1 ) Let the voltmeter reading for the central office battery be A = 22 volts. ( 2 ) Let the resistance of the supply lead from the central office be B = 12 ohms. (3) Let the resistance of the path connected across the P.B.X. bus-bars by each busy cord circuit be C = D = E = 70 ohms. ( 4) Also, assume the lowest bus-bar potential permissible for satisfactory operation to be 14 volts. B rvvvv 12 Ohms .io22 Volts Fig. 23 i 70 Ohms .... C .... With one cord busy, as shown in Fig. 23, the total resistance of the circuit is B + C = 12 + 70 = 82 ohms. In this case the current in C is I = EjR = 22 -7- 82 = .268 amp Page 87 and the potential across C ( same as from F to ground, see Fig. 22) is E = I X R = .268 X 70 = 18.8 volts. ..!!. 22 Volts B ..1\ 1\1\' . 12 Ohms t 70 Ohms C ,. Fig. 24 D j 70 Ohms Next, with two cords busy, as shown in Fig. 24, the equivalent resistance of the two equal paths then bridged across the bus-bars is half that of one path, or 35 ohms ; and the combined resistance of the circuit is 12 + 35 = 47 ohms. Under this condition the current fed from the central office battery is I = E/R = 22 + 47 = .468 amp. This total current divides-equally, of course-between the equal paths C and D, so that the current in each path is .468 + 2 = .234 amp. The potential across the P.B.X. bus-bars may be computed either from the total current and the combined resistance of the two parallel paths, or from the resistance of one of the paths and the current through it-thus E = IR = .468 X 35 = 16.4 volts or .234 X 70 = 16.4 volts. In like manner,� with three cords busy, as shown in Fig. 25, the equivalent resistance of paths C, D and E in multiple is 23.3 ohms ; the combined resistance of the circuit is 35.3 ohms ; the current fed from the battery is .623 ampere and that through each of the three equal paths C, D, and E is .208 ampere ; and the potential across the bus-bars is 14.5 volts. ' Page 88 B 12 Ohms ..!!!..22 Volts Fig. 25 From the foregoing example we �see that the voltage across the P.B.X. bus-bars drops as the number of busy cords is increased. Tabulating the results of the above computations, we have- Number of Busy Cords 1 2 3 Bus-Bar Voltaf!e 18.8 volts 16.4 " 14.5 " The relation between the number of busy cords and the corresponding bus-bar potential embodied in these tabulated values, can be shown graphically by what is known as a curve ; and as much information in bulletins and text books is presented by means of curves it will be well worth while, for those who have not already done so, to take this opportunity to learn to read a curve. In Fig. 26 is shown a curve which portrays the relation- just tabulated-between the voltage across the P.B.X. bus-bars and the number of busy cords. As this illustrates, curves are drawn upon a gridwork background which most commonly consists of uniformly spaced horizontal and vertical lines. The first step in laying out a curve upon such a grid is to assign suitable values ( of the quantities to be represented by the curve) to the divisions into which the vertical and horizontal grid lines divide one anPage 89 22 !::! 20 .. ID"' "" " 14 0 B .. '- .. .. 1 2. Number of Busy Cords Fig. 26 3 .... ........ 4 ............ other. Thus, in Fig. 26, as designated by the scale of values written along border line A, each division of the horizontal lines represents one busy cord-the value assigned to denote the number of busy cords increases by one for each division we advance along line A from the point representing zero cords. Similarly, as designated by the scale of values written �along border line B, each division of the vertical lines in Fig. 26 represents 2 volts-the values assigned start at 14 volts and increase by 2 volts per division up to 22 volts. This range of voltages was chosen here because it is the range in which we are interested in the example we are now considering : 14 volts is the lowest bus-bar voltage at which operation is satisfactory ; at the other extreme, with zero busy cords there will be no current drain, the drop over the feeder pairs will be zero, and hence the voltage across the P.B.X. bus-bars will equal the assumed central office battery voltage of 22 volts. i Page 40 Having assigned suitable scales of values to the grid lines, we next proceed to locate the points through which the curve itself is to be drawn. We have j ust seen that, with zero cords, the voltage across the bus-bars is 22 volts ; hence, on the vertical line representing zero cords, we mark the point corresponding to 22 volts. Next, referring to the tabulation above, we see that, with one cord busy, we shall have 18.8 volts across the bus-bars ; consequently, on the vertical line representing one busy cord, we mark the point corresponding to 18.8 on the voltage scale. In like manner, on the line representing two busy cords, we mark the point corresponding to 16.4 on the voltage scale ; and on the line representing three busy cords we mark the point corresponding to 14.5 volts. We have now located four points through which can be drawn a curve C. If we like, we can extend this curve to the point at which it will cross the vertical line representing four cords, and from this crossing point we can estimate what the voltage across the bus-bars would be with four cords busy. We find it would be about 13 volts, which is lower than required for proper operation. The preceding example illustrates the method of constructing simple curves and of reading them. A more detailed description of the method of drawing curves will be found in Appendix "A" at the end of Section II. In the above discussion we assumed a constant resistance for the battery supply lead from the central office, and determined the values of the P.B.X. busbar voltage with different numbers of busy cords. It is also often necessary to ascertain the maximum resistance of the battery supply feeder which satisfactory operation of the P.B.X. will permit. Let us, therefore, next consider the values to which, with Page 41 P.B.X.'s having various numbers of cords, the feeder resistance must be limited in order that, when all cords are busy, the bus-bar voltage shall not drop below the value required for satisfactory operation. Inasmuch as the P.RX. will not operate satisfactorily on a voltage lower than 14, and as the voltage of the central office battery is 22 volts, the voltage drop in the battery supply conductors must not exceed 8 volts. Referring to Fig. 22, the highest resistance we may have in B without having the voltage drop between the central office battery and the P.B.X. exceed 8 volts, can be figured by Ohm's Law ; applying the relation R =Eji, we see we have merely to divide 8 by the total current fed to the P.B.X. In these computations the average current per cord circuit will be assumed to be .2 ampere. The following table shows the computations and results for each of various numbers of cords. Table I Allowable resistance with 2 cords, 8 + .4 = 20.0 ohms 4 " 8 + .8 = 10.0 " 6 " 8 + 1.2 = 6.7 " 8 " 8 + 1.6 = 5.0 " 10 " 8 + 2.0 = 4.0 " 12 " 8 + 2.4 = 3.3 " We now have the values of two variable quantities one of which depends upon the other. The relation between these quantities is represented graphically by the curve in Fig. 27. This curve, drawn from the information in Table I, shows us the allowable feeder resistance for any number of busy cords. We can now use the curve to find the resistance of a lead required for a P.B.X. board with any number of 22 20 18 .. 16 6 14 �..5 . 12 g 10 I : 4 2 0 0 ' 1\ \ '\ 2 .. '\. " .. ----- 4 6 8 Number of Busy Cords Fig. ?:1 Page '2 10 12 cords. For example, if we have a board equipped with five cords we select the point midway between 4 and 6 on the horizontal ..cale, and follow a vertical line until it intersects the curve ; then, following a horizontal line from this point, we find it intersects the vertical scale at 8. Our lead must, therefore, be so made up that its resistance is not more than 8 ohms. Fig. 28 shows the sleeve circuit of a cord circuit. This is another good example of a combination of series and parallel paths. When the contact of the supervisory relay is open no current will flow through the 40-ohm resistance ; we then have a single path with 30, 83 and 120 ohms (a total of 233 ohms) in series. With 24-volt battery the current in this circuit will be 24 + 233 = .103 ampere. When the supervisory relay operates, however, a resistance of 40 ohms is connected in parallel with the 120-ohm lamp. The combined resistance of the lamp and this 40-ohm shunt is Page 43 120 Ohms Fig. 28 40 X 120 � = 30 ohms. 40 + 1..0 Consequently the total ..resistance of the circuit becomes 30 + 83 + 30 = 143 ohms and the current drawn from the battery then is 24 + 143 = .168 amp. The object of the 40-ohm shunt is to reduce the current through the lamp, thereby dimming the light so that it does not show through the lamp cap. Let us see how �much this reduction figures out to be. In the first case the current in the circuit, all of it flowing through the lamp, was .103 ampere. The .168 ampere in the second case divides, p art of it flowing through the lamp and part through the shunt. There are two methods by which we can compute how � much of the total current flows in each path. The first is a short-cut method : we note that the conductance of the 40-ohm shunt is three times that of the 120-ohm lamp, and consequently the current through the lamp is one-third of that through the shunt, or one-fourth of the .168 ampere through both paths ; i.e., the lamp current is .042 ampere and the current through the shunt is .126 ampere. The second method is a general one which can be applied to determine the current in any or all of any number Page 44 of parallel paths. This general method is based upon the following line of reasoning. We have seen that the voltage across any group of parallel paths is equal to the total current through the group ( sum of the currents in the individual paths) multiplied by _ the equivalent resistance of the group. This, however, is the same as the voltage across each path in the group, and it must, therefore, equal the product of the current in any one path multiplied by the resistance of that path. Consequently the current in any particular path of the group must equal the voltage across the group divided by the resistance of that particular path. In the example we have just been considering, we found the combined resistance of the lamp and the shunt to be 30 ohms and the total current through the two paths to be .168 ampere ; the voltage across these parallel paths must, therefore, be E = I X R = .168 X 30 = 5.04 volts. Hence, the current through the 120-ohm lamp is I = EjR = 5.04 + 120 = .042 amp and the current through the 40-ohm shunt is 5.04 + 40 = .126 amp. These results are, of course, identical with those already found by the short-cut method. The steps to be carried out in this method of computing the current in any one of a group of paths in multiple are as follows : ( 1) Determine the combined resistance of the group of parallel paths. ( 2 ) Compute the total current through the group. ( 3 ) Multiply the current in (2) by the resistance in ( 1 ) . This gives the voltage across the group of parallel paths. Page 45 ( 4) Divide the voltage found in (3) by the resistance of the particular path in which it is desired to find the current. The result is the current required. . ELEMENTARY PRINCIPLESDIRECT CURRENTS SECTION I-E MEASURING INSTRUMENTS-CURRENT AND VOLTAGE MEASUREMENTS Page 46 CURRENT AND VOLTAGE MEASUREMENTS In our studies we have learned how to apply Ohm's Law to determine either the voltage, the current, or the resistance, when any two of these quantities are known and it is desired to find the third. It is assumed that the two which are known have been previously determined, either by calculating their values from known conditions or by measuring them with meters. Current can be measured directly with an ammeter, and voltage, with a voltmeter. Each of these instruments consists essentially of a meter element which moves a pointer over a scale. This scale has previously been calibrated by comparison with a standard, and it is only necessary to note the scale reading indicated by the pointer to learn the value of current flowing through an ammeter or the voltage impressed across the terminals of a voltmeter. Galvanometer : In the Weston model direct cur- Fig. 29 rent instruments, which are the ones most commonly used, the meter element is the same for either a voltPage 47 meter or an ammeter. This meter element is known as a D'.A.rsonval galvanometer. When associated with the proper series resistance it acts as a voltmeter, and when associated with proper current carrying shunts it acts as an ammeter. For some types of measurements it is necessary, as we shall shortly see, that the instrument be equipped with leads whose resistance is taken into account in calibrating the meter. We shall refer to these as calibrated leads. Fig. 29 shows a simple galvanometer of the D'.A.rsonval type. Current flowing through the movable coil sets up a magnetic field which reacts with the field between the poles of N and S of a permanent magnet, causing the coil to rotate against the spring tension. This movement of the coil, which is proportional to the current through it, carries the pointer across the scale. The moving coil of a galvanometer is very light and is mounted on j eweled bearings so that a very small current will cause the pointer or "needle" to travel the full length of the scale. For example, let us assume it takes a current of .025 ampere to cause full scale deflection of the needle ; and let us also assume the resistance of the coil and calibrated leads to be 2 ohms. By applying Ohm's Law the voltage which must be impressed across the terminals to cause a full scale deflection is determined to be E = IR = .025 X 2 = .05 volt. Fractions of volts are spoken of in terms of millivolts, j ust as we express fractions of amperes in milliamperes. To convert volts into millivolts, multiply by 1000, e.g., .05 volt = 50 millivolts. Consequently, depending upon whether we are interested in measuring current or voltage, we can consider that full scale deflection is caused by a current of Pare 48 25 milliamperes through the galvanometer or by an emf of 50 millivolts across its terminals. We can, therefore, calibrate the galvanometer for use either as a milliammeter or as a millivoltmeter. If we divide the scale into one hundred parts, a full scale reading of 100 divisions will indicate a current" of 25 milliamperes, and each division will equal .25 milliampere. Likewise, full scale reading will indicate an emf of 50 millivolts, and each division will equal .5 Fig. 80 millivolt. Fig. 30 shows the scale as it would look if it were calibrated as we have just described. The meter can now be used to measure either voltage drop in millivolts or current flow in milliamperes. Cable Sheath t-----.005 Ohm-------1 Fig. 81 Millivoltmeter : A good example of the use as a millivoltmeter is in electrolysis measurements where we measure the millivolt drop over a section of cable sheath, as in Fig. 31. If we know the resistance per unit length of a certain size cable sheath, we can Page 49 determine the amount of current flowing in it by measuring the voltage drop across a known length, and calculating by Ohm's Law. In the example in Fig. 31 let us assume the meter reading to be 20 millivolts when the instrument is connected, by means of its calibrated leads, across a length of cable sheath whose resistance is .005 ohm. First converting the 20 millivolts into volts, and then applying Ohm's Law, the current in the cable sheath is found to be I = EjR = .020 + .005 = 4 amp. Use of the galvanometer as a millivoltmeter is one of the cases, recently referred to, in which it is important that the instrument be equipped with calibrated leads. It will be well at this time to examine why. A voltage mea-surement is a measurement of a difference between two points which may be more or less widely separated. Leads of some sort must, therefore, be provided to connect the meter terminals to the points between which the voltage is to be measured. To see why calibrated leads must be used if small voltages are to ..e measured accurately, let us again refer to the example in Fig. 30 ; and let us assume that the value of 20 millivolts which we measured using calibrated leads is the true voltage. Now let us repeat the measurement using leads whose resistance is .05 ohm less than the calibrated leads-will the meter still measure the voltage correctly Y It will not. The resistance of the meter element plus the calibrated leads was 2 ohms ; hence, with 20 millivolts across the leads, the current through the meter was 1000 X ( .020 voltj2 ohms) = 10 milliamperes. 'The meter measures this current, its needle deflect.. Page 50 ing to 10 on its milliampere scale. As will be seen in Fig. 30, this corresponds to 20 on the millivolt scale, and so we read the voltage as 20 millivolts. The total resistance of the meter element plus the new leads, however, is 2 - .05 = 1.95 ohms. Consequently the current through the meter element when 20 millivolts is impressed across the new leads is 1000 X ( .020 voltj1.95 ohms) = 10.25 milliamperes. Again, the meter measures the current through it ; its needle deflects to 10.25 on its milliampere scale. But this, we see from Fig. 31, corresponds to 20.5 on the millivolt scale. Hence we would now read the voltage to be 20.5 millivolts. The change in the meter leads has, of course, not altered the actual value of the voltage drop across the cable sheath in Fig. 31. What has happened is merely that the meter reading of the voltage has changed from the correct value of 20 millivolts with the calibrated leads to an incorrect indication of 20.5 millivolts. We thus see that the calibrated leads must be used with the instrument when it is employed as a millivoltmeter. Milliammeter : Fig. 32 shows a meter connected in a circuit as a milliammeter to measure the current through a relay. We shall assume this to be the same meter we have j ust been discussing. The values of the current in this circuit under the following con- Fig. 32 Page 51 ditions would be as shown below : ( 1 ) before the meter is connected into it ; ( 2 ) when the meter with calibrated leads-2 ohms total resistance-is connected ; and ( 3 ) when the meter with the same uncalibrated leads as previously-1.95 ohms total resistance- is connected. I = 1000 X I = 1000 X (1) 24 1000 + 198 (2) 24 1000 + 2 + 198 (3) 24 = 20.033 milliamps = 20.000 milliamps I = 1000 X = 20.001 milliamps 1000 + 1.95 + 198 The question o� relative accuracy in this case depends upon what current it is we wish to know. In any event, when the meter is included in the circuit it measures the current then flowing through the circuit. Connecting the meter in the circuit, however, introduces additional resistance and hence reduces the current. Consequently i�, as is usual, we wish to learn as closely as we can the current when the meter is not included in the circuit, then the lower the resistance of the meter and leads the less will its reading differ from the value we wish to know. The values computed above bear out the foregoing : the value in ( 3 ) -obtained with the lower resistance, uncalibrated leads-is slightly nearer the desired value in ( 1 ) than is the value in ( 2 ) obtained with the calibrated leads ; and the reading would more closely approach the desired value if meter leads were omitted. Actually, of course, the difference between the value in (2) or (3) and that in ( 1 ) is far less. � . Page 52 than the accuracy with which the meter could be read, so that the resistance of the leads in the example in Fig. 32 is not a matter of practical importance. In general, however, we conclude that, although the meter must be used with its calibrated leads when employed as a millivoltmeter, it is preferable to omit the leads when it is employed as a milliammeter. Ammeter : One of the most common uses to which a millivoltmeter is put is to make it serve as an ammeter by connecting it across an external shunt. Fig. 33 shows how the shunt S and meter G are connected to measure the current in a circuit. It is important that the meter's calibrated leads be the leads '---------ill t-----v Fig. 33 used to connect it across the shunt. Let us now see how we can figure out what the resistance of the shunt must be in' order that the meter may be read as an ammeter whose full scale deflection indicates any desired maximum value of current in the circuit. The first step in designing a shunt is to decide what circuit current--whether 1, 5, 10, 50 or 100 amperes or other convenient value-is to be indicated by full scale meter reading. We then compute the ratio of this maximum circuit current to the Page 68 maximum meter current ( current through the meter which will cause full scale deflection) . If the maximum meter current is not known we can apply Ohm's Law to determine its value from the resistance of the meter plus leads and the full scale reading of the meter in volts. We next note that, if the current in the circuit in Fig. 33 is, for example, to be 10 times the current through the meter, then the current through the shunt will be 9 times the current through the meter ; and the resistance of the shunt will have to be 1j9th the resistance of the meter and leads. J:i-,rom this observation we see that the resistance of the required shunt can always be obtained by dividing the resistance of the meter and leads by one less than the above ratio of the desired maximum circuit current to the maximum meter current. To illustrate the foregoing, let us suppose we wish to measure currents up to a maximum of 1 ampere by means of a millivoltmeter whose resistance (including leads) is 2 ohms and whose full scale reading is 100 millivolts. Maximum meter current in this case 1s I = EjR = .100 -7- 2 = .050 amp. The ratio of maximum circuit current ( 1 ampere ) to maximum meter current then is 1 -7- .050 = 20. Consequently the resistance of the 1-ampere shunt will be 2j ( 20-1) = 2j19 = .1053 ohm. In like manner we could determine the resistance of a 10-ampere shunt, a 100-ampere shunt, or a shunt which would enable us, with a given millivoltmeter, to measure currents up to any other full scale value we desire. If the scale of a meter has 100 divisions, then each division is read as .01 ampere when the meter is used with a 1-ampere shunt, as .1 ampere . . Page 54 when used with a 10-ampere shunt, as .5 ampere when used with a 50-ampere shunt, etc. There is an advantage in having a wide range of shunts available ; it enables us to select one whose rating is such that the reading for the current we wish to measure will be well up on the scale. An example will show how important this is from the standpoint of accuracy. If a meter whose scale has 100 divisions were used with a 100-ampere shunt to measure a current of 2 amperes, the needle would register but two divisions above zero, so that an error of one-tenth division would be 5% error. A higher degree of accuracy could be obtained by using a 10-ampere shunt. The needle would then register twenty divisions above zero, and an error of one-tenth division would be only a .5% error. When meters of the type which we have been referring to as millivoltmeters are primarily intended to be used with external shunts for measuring currents, their scales are usually graduated to read amperes directly. Such meters are called ammeters. In some of the older types of ammeters the shunt was located in the base of the instrument, with heavy lugs on the meter for connecting it into a circuit. Because of the heating of the shunt, and the magnetic field which is set up in the meter element, this type did not prove satisfactory. The use of external shunts eliminates these difficulties and has the added advantage that one meter can be used with any one of several shunts of whatever ratings are desired. Fig. 34 shows a common type of external shunt for use in measuring large currents. A is a wooden base. BB are heavy copper lugs joined together by strips of resistance metal 0. These strips are made of an alloy which has a higher resistance than copper and which will not appreciably change resistance when Page 55 c Fig. 34 heated. DD are heavy bolts for connecting into the circuit, and EE are small screws for connecting the meter leads. Voltmeter : Let us now consider how the same galvanometer or moving element which we first called a milliammeter and then a millivoltmeter, can be used to measure higher voltages. Suppose we wish to measure values up to 30 volts by means of a meter element whose resistance is 2 ohms and which deflects full scale when .025 ampere flows through it. By Ohm's Law 30 volts will cause .025 ampere to flow through a resistance of R = Ejl = 30 -;- .025 = 1200 ohms. Hence, if we place 1198 ohms in series with the 2 ohms of the meter element as shown in Fig. 35, the 1198 Ohms 30� 1...---------ill l---------' Fig. 35 Page 156 deflection will be full scale when 30 volts are impressed across the terminals. Similarly, 150 volts will cause .025 ampere to flow through 150 -;- .025 = 6000 ohms. Consequently, if we wish to measure up to 150 volts we can do so by placing 5998 ohms in series with thP- met-er element. 1198 Ohms [-fl50..-------..=,:..: ______ _ ... , "--------t�l�l�t--------' Fig. 36 Fig. 36 shows how we can connect a single meter element to measure values up to 30 volts or up to 150 volts. In the modern voltmeter the resistance units would be mounted inside the meter with the terminals on the instrument case, somewhat as shown 'in Fig. 37. Fig. 38 shows how the scale of the double range voltmeter would look. We have now seen that the galvanometer type meter element serves several purposes. Used without accessories, it acts as a milliammeter ; provided with calibrated leads, it becomes a millivoltmeter ; with calibrated leads and a calibrated shunt it serves as an ammeter ; and a resistance in series with it ( called a "multiplier") converts it into a voltmeter. The "volt-milliammeter" in the No. 14 local test desk is an example of a meter element arranged for use either as a milliammeter or as a voltmeter. In this Page 57 30 Fig. 37 "' .s:E 0 .. - + case, instead of being connected to terminals as in portable meters, the leads are wired to switch keys by means of which the arrangement of shunt and series resistances is controlled. Fig. 39 shows the Fig. 38 netw ork of resistances used with the meter element in the No. 14 local test desk, and Fig. 40 shows the simplified circuit for each connection. By calculating the distribution of current in the first two circuits we find that only .0006 ampere flows through the Meter Element Fig. 39 4"' Page 58 V'-o 1.2 M . A. 80,000"' 120V .....,-----oo480 M. A. 4.. 76.. 1600 ... Fig. 40 meter element to give a full scale deflection of the needle. In the third circuit we find the 1600-ohm meter element shunted by 1600 ohms resistance, so that only half the current will flow through the meter ; and as the total resistance is 20,000 ohms, the total current will be .0012 ampere when 24 volts is impressed. But as only half the current flows through the meter element, the current causing full scale deflection is again seen to be .0006 ampere. The Page 69 same is true of the 120-volt, 100,000-ohm circuit in the fourth arrangement. The 1600 ohms designated as meter element is made up of a m.eter element of about 400 ohms with resistances in series and parallel to give the total combined resistance of 1600 ohms. This network is adjusted for each individual meter element. Meters of this type are much more sensitive than the usual portable meters. ELEMENTARY PRINCIPLES DIRECT CURRENTS SECTION I-F RESISTANCE MEASUREMENTS Page 60 RESISTANCE MEASUREMENTS Measurement of Resistance : In considering methods of measuring resistance it is desirable to know the accuracy required in any particular case in order that we may suit the method of measurement to the requirements. For instance, if we desired to know the effect of placing a temporary relay in a signal circuit, we would probably not need to measure the resistance of the relay more accurately than to within 5 or 10% ; but if we were locating a fault in a cable conductor for the purpose of making repairs which involve the expense of open-ing a street pavement, we would be justified in taking considerable time in getting a very accurate measurement. From the standpoint of the accuracy attainable with the instruments employed in routine work, the methods of measuring resistance which we shall consider here fall into two classes. In the first class are a group of methods, useful where a high degree of accuracy is not required, in which resistance is computed from measurements made with voltmeters and ammeters. The more accurate method which we shall consider is measurement by means of a sensitive galvanometer in combination with a network of known resistances arranged in what is known as a Wheatstone bridge. Volt-Ammeter Method : In this method a voltmeter V, an ammeter A, and the unknown resistance R, are connected in either of the ways shown schematically in Fig. 41. For most practical purposes the result obtained by applying Ohm's Law to the voltage and current read from the meters is accepted as the resistance of R. We can see from the schematics, however, that this is somewhat in error, and that where greater accuracy is required an appropriate Page 61 v A E .... __ --lllt---.....J (A) Fig. 41 v A E '"----lilt-----' (B) correction must be applied to the resistance indicated by the meter readings. In Fig. 41A. the ammeter measures the combined current through the parallel paths R and V, and the voltmeter measures the voltage across them ; consequently the result obtained by applying Ohm's Law to these meter readings is the combined resistance of R and V in parallel. This result will differ fr..m R by less than 1 % if the voltmeter resistance is one hundred or more times the resistance of R. If we desire to correct this indicated resistance we have merely to convert it into its equivalent conductance, subtract the conductance of the voltmeter, and convert the remaining conductance into equivalent resistance. Turning now to Fig. 41B, here the ammeter measures the current through A and R, and the voltmeter measures the drop across these two elements in series ; hence the result obtained by applying Ohm's Law to the meter readings in this case is the resistance of R plus the resistance of A. This indicated resistance will differ from R by less than 1 % i f the ammeter resistance i s less than 1j100 o f the resistance of R. To correct this indicated resistance we have merely to subtract from it the resistance of the ammeter. To illustrate the two methods in Fig. 41, and the Page 62 v. 15,000.. V� 15,000.. E .. 24 ' '"----i ll l------' (A) Fig. 42 E = 24v '------i ll t----...1 (B) degree by which the result obtained with each differs from the true value of R, let us first compute what the meters will read if we assume the battery to be of 24 volts and the resistance of each element to be as shown in the corresponding networks in Fig. 42. In Fig. 42A the combined resistance of R and V in parallel is (500 X 15,000) / ( 500 + 15,000) = 484 ohms. Hence the reading of the ammeter in Fig. 41A would be 24/ ( 484 + 2 ) = .0494 amp and the voltmeter would read .0494 X 484 = 23.9 volts. The meter readings in Fig. 41A would, therefore, indicate the resistance of R to be 23.9 ...;--.0494 = 484 ohms. This is 16 ohms, or 3.2%, less than the actual value of R. In Fig. 41B the voltmeter would read 24 volts and the reading of the ammeter would be 24/ (500 + 2 ) = .0478 amp. These readings would indicate the resistance of R to be 24j.04 78 = 502 ohms. In this case the indicated resistance is 2 ohms, or .�%, higher than the actual resistance of R. It is not to be infe:-red from the above comparison Page 63 that the resistance indicated by the meter readings in Fig. 41B is always closer to the actual value of R than is the resistance indicated by the meter readings in Fig. 41A. With the 2-ohm ammeter and the 15,000-ohm voltmeter assumed in the above examples, computations like those just carried out will show that, if R were 174 ohms, the correction would be 1.15 % for either set of meter readings ; that if R were less than 174 ohms the correction for Fig. 41A would be smaller than with Fig. 41B ; and that, as we found in the above examples, the correction with Fig. 41B will be smaller than with Fig. 41A if R is greater than 174 ohms. Where values more accurate than those obtained directly from the meter readings are required, the corrections already mentioned can be applied. Thus, in the example of Fig. 41A worked out above, the indicated resistance of 484 ohms may be corrected by converting it into its equivalent conductance, and from that, subtracting the conductance of the voltmeter. The conductance of R so obtained is ( 1j484) - ( 1j15,000) = 1j500 mho. Hence the resistance of R is 500 ohms. The method in Fig. 41B is much easier to correct. To correct the value of 502 ohms indicated in the above example of this method, we merely deduct from it the resistance of the ammeter. Thus, for the corrected value of R we again obtain 502 - 2 = 500 ohms. Voltmeter Method : If the resistance to be measured is high, and we have a voltmeter whose resistance is known, the measurement can be made using only the voltmeter. Fig. 43 shows how the voltmeter would be connected for this test. The switch is first thrown to the position indicated by solid lines, and the battery voltage E read on the Page 64 Rv � l5,000"' v E � 24V '-----------i tll---------1 Fig. 43 voltmeter. Then the switch is thrown to the position indicated by dotted lines and the voltmeter again read. Let this second voltage-which is, of course, the drop across the voltmeter-be denoted by V. Inasmuch as the voltmeter of resistance Rv and the unknown resistance Rx are now in series across the battery, the voltage drop across Rx at this time must be (E - V) ; and as the same current is flowing through both of these elements, the ratio of their resistances must be the same as the ratio of the voltage drops across them, that is Rx E-V E - = -- = --1. Rv V V Hence the value of the unknown resistance is E Rx = R. (- -1) ohms. v This relation enables us to determine the value of Rx from the two voltmeter readings E and V and the known resistance R. of the voltmeter. To illustrate this method let us apply it to find the value of Rx in Fig. 43. We shall assume the resistance of the voltmeter to be R. = 15,000 ohms, the voltage of the battery (reading of the voltmeter with switch in solid line position) to be E = 24 volts, and the voltmeter reading with the switch thrown to the Page 65 dotted line position to be V = 20 volts ; then 24 Rx = 15,000 X (- - 1) = 3,000 ohms. 20 In the above discussion we have ignored the resistance of the power supply used in the measurement. This neglect, however, will not increase the probable error if the resistance of the voltmeter is a thousand or more times as great as the power supply resistance. Assuming a voltmeter of high enough resistance to eliminat_e any error from this source, the accuracy attainable with this method is greatest when the unknown resistance equals the resistance of the voltmeter. It follows, therefore, that this method is best adapted to the measurement of quite high resistances. Line Wire v Rx = Leakage Resist Fig. 44 A familiar example of the measurement of high resistances by this voltmeter method is its use by test desks in routine measurements of the insulation resistance of outside plant. As the leakage resistance is usually several megohms ( one megohm equals one million ohms) greatest accuracy will be attained by employing a voltmeter of very high resistance. The 100,000-ohm arrangement of the test desk voltmeter is the one now used for this work. The voltmeter is first thrown across the testing battery and the voltage E read ; then it is thrown in circuit with the bat- � Page 66 tery, line, and ground, as shown in Fig. 44, and the voltage V which it then indicates is read. As an illustration, if the values of E and Rv be as shown in Fig. 44, and the reading V is 10 volts, then, by means of the above formula for computing the unknown resistance from the two readings of the voltmeter, the insulation resistance is found to be or 150 Rx = 100,000 (- - 1) = 1,400,000 ohms 10 Rx = 1.4 megohms. If the line is 10 miles long and the leakage is evenly distributed we can assume the total resistance to be made up of ten equal resistances in multiple, as in Fig. 45. Each of these resistances will be equal to ten times the combined resistance of the group in multiple. Fig. 45 Wheatstone Bridge : Of the several methods for measuring electrical resistance, the Wheatstone bridge method is in general the most accurate, and is the one most often used. The principles governing its operation will therefore be explained in detail. The Wheatstone bridge method of measurement is very simple. The forms of the Wheatstone bridge ordinarily used, however, seem quite confusing until the connections are traced out and set down in a Page 67 diagram. When this is done it is found that however much different forms of the bridge may differ in mechanical details or in the arrangement of parts, the connections of all can be reduced to the very simple circuit which will be discussed here in explaining the principle on which these bridges operate. To understand the operation of the Wheatstone bridge it is only necessary to keep in mind the fundamental relations governing current, voltage and resistance in a direct current circuit. These relations are now quite familiar to us under the name of Ohm's Law. + .. E ..0. ..----------------.... 6.. Fig. 46 In Fig. 46 is a simple circuit in which, between points A and B, are four resistance elements arranged in two parallel paths ACB and ADB. Let the voltage drop across each of these resistances be denoted as shown on the diagram. Since the potential drop from A to C is V" and the drop from A to D is V2, we can see that the potential difference V between points C and D is V = V2 - V1� We can also see that, by varying the resistances, we can make V1 and V2-each independently of the other-whatever portion we please of the total volt-� Page 68 age E impressed across points A and B. Consequently- and this is the important thing-the resistances can always be so adjusted as to make V1 = V2 and V3 = V4� When the resistances are thus adjusted the bridge is said to be "balanced." Fig. 47 There are two aspects of this particular adjustment which make it the basis of Wheatstone bridge measurements. Firstly, since V1 = V2, then V2 = V1 = 0, so that V = 0. In other words, because the drop from A to C equals the drop from A to D the potential difference between points C and D is zero. If, therefore, we connect or "bridge" a galvanometer across points C and D as indicated in Fig. 47', no current will flow through it when the bridge is balanced, and so its needle will show no deflection. Conversely, if we so adjust the arms of the bridge that the galvanometer needle shows no deflection, the bridge will be balanced. We are thus provided with a very sensitive visual indication as to when an accurate balance has been attained. Secondly, when V1 = V2, then also, of course, V3 = V4. Hence we can see that, when the bridge is in balance, the drops across the two elements in the path ACB are proportioned in the same ratio as are the drops across Page 89 the two elements in the path ADB. This, stated symbolically, is v. v. v, v, This relation, it will now be shown, leads directly to the fundamental formula of the Wheatstone bridge. Since no current flows through the galvanometer when the bridge is balanced, the current from A to C is the same as from C to B and the current from A to D is the same as from D to B. If, therefore, we Key Galvanometer D 8 Fig. 48 denote the currents as shown in Fig. 47, and designate the four resistances as shown in Fig. 48, then, by Ohm's Law, the voltage drops in the above ratios can be expressed as � V, = IuR .. v. = IDR2 Consequently the above relation among the voltage drops in the balanced bridge, written in terms of IR expressions, is IoRx IcR. luR. IcR, But in this the currents cancel out, leaving Rx R. R, R, or finally R2 Rx = --Ra. R, Page 70 The diagram in Fig. 48 is a simplified schematic of the Wheatstone bridge circuit. This diagram should be memorized because, as previously stated, regardless of how greatly various forms of the Wheatstone bridge differ in appearance, their connections will be found to be the same in effect as this simple network. The final one of the above equati9ns should also be memorized because it shows the relation among the four groups of resistances or "arms" of the bridge after a balance has been attained. Referring to Fig. 48, the arms R1 and R2 of a Wheatstone bridge are known as the ratio arms ; R3 is known as the rheostat arm, or balance arm ; and Rx is the unknown resistance that is being measured. The measurement is performed by setting the ratio arms as discussed later, and then adjusting the rheostat arm until the galvanometer shows no deflection . when the two keys, first the battery key and then the galvanometer key, are closed. The value of the measured resistance is then computed by the formula above from the settings of the ratio arms and the resistance to which the ratio arm was set -in balancing the bridge. The settings of the ratio arms depend upon the range of resistances provided for adjusting the rheostat arm and upon the order of magnitude of the resistance to be measured. A common arrangement is for the rheostat arm to be adjustable, in steps of one ohm, to any resistance from zero to 9999 ohms. With such an arrangement, the ratios for which arms R1 and R2 would be set when measuring resistances in various ranges of magnitude are as shown in the following tabulation. Page 71 Value of R2/R1 .001 .01 . 1 1 10 100 1000 1 10 100 1000 Range of Rx (ohms) .001 to ' 9.999 ohms .01 " 99.99 " . 1 " 999.9 " " 9999 " " 99990 " " 999900 " " 9999000 " The resistances of the Wheatstone bridge must be accurate, non-inductive, readily cut in or out of circuit within the limits needed to get a proper balance for the range of resistances to be measured, and must be moistureproof and protected from injury. There are three principal means of varying the resistance in the bridge arms : ( 1 ) Connecting the individual resistances between massive brass blocks which are joined by removable solid brass plugs. With the plug in place the resistance is short-circuited. Removing the plug cuts the resistance in circuit. A variation of this method provides two bus-bars for each group of resistances, by means of which the resistances desired are cut into circuit by the plugs, the unused resistances remaining ''legged on," but not in circuit. This type is known as the post office type or plug bridge. (2) Using massive terminals to the resistances over which a dial switch is moved. For the "resistance" arm or rheostat arm, three or more dial switches are needed, one for units, one for tens, one for hundreds, etc. This type is known as a dial bridge. ( 3 ) Having a movable arm in direct contact with the resistance wire, the position of the arm determines the amount of resistance in circuit. This type is known as a slide wire bridge. ELEMENTARY PRINCIPLESDIRECT CURRENTS SECTION I-G PERMANENT MAGNETS ,. Page 72 PERMANENT MAGNETS Introductory Magnetism is of great importance to the telephone man. We use this property in relays, subscriber bells, receivers, generators, repeating coils, induction coils, and many other types of apparatus common in our telephone work. It is, therefore, necessary for us to have a good working knowledge of magnets and magnetism. The actual operation of our relays or of any other apparatus which depends upon magnetism may seem far removed from the ideas that are to be brought out by describing experiments in which iron filings sprinkled on glass are made to move by a magnet ; nevertheless we must have these ideas in our minds, for they are the most concrete means of explaining the action of the force 'which does so much work for us. Permanent Magnets The subject of magnetism naturally divides itself into several parts, the first of which deals with permanent magnets. Permanent magnets are made of steel or of such alloys as cobalt-steel, realloy (iron-cobalt-molybdenum ) , etc. They are called permanent because, with proper treatment, they retain their magnetism indefinitely. Heat or sharp jarring, however, causes them to lose their strength. Magnets possess the property of attracting iron ; this is the property which we call magnetism. The two end areas of a magnet over which the magnetic force is most pronounced are called the poles. If a bar magnet be freely suspended it will align itself lengthwise with its poles in a north-south direction like a compass needle. The pole which points north is called the � Page 73 north or positive pole and the pole which points south is called the south or negative pole. If we bring a north pole and a south pole close together we find they attract each other, but if we bring two north poles or two south poles close together we find they repel one another. A fundamental law of the action of magnetic poles which should be remembered is, therefore, unlike poles attract each other, like poles repel one another. The substation ringer, which will be described later, is a good example of the practical application of this principle of the attraction and repulsion of magnetic bodies. Fig. 49 Any region in which a magnetic force acts is called a magnetic field. Hence a magnetic field exists in the region surrounding a magnet. To get a clear idea of a magnetic field of force let us consider Fig. 49. Here we have a thin plate of glass placed over an ordinary bar magnet which is resting in a horizontal position. On the glass has been sprinkled a light covering of iron filings which, when the glass is tapped, arrange themselves, as the illustration indicates, in curved lines extending from one pole of the magnet to the other. The direction of these lines is, at every Page 74 point in the field, the direction in which the magnetic force at that point acts ; and, as will be discussed later, the greater the magnetic force in any region, the closer together are the lines in that region. We are led by this to think of the magnetic field in terms of these lines, and to look upon these "lines of force" as representing both the direction of the magnetic forces in the field and the strength of the field as well. These "lines of force" are also commonly known as "lines of magnetic induction," and the lines collectively are frequently spoken of as the ":O.ux." We shall now consider certain attributes of the lines of force which will help us understand the behavior of magnets and magnetic fields. Fig. 50 A bar magnet and the magnetic field surrounding it are shown schematically in Fig. 50. As this diagram indicates, the lines of force are always closed loops, their positive direction being as indicated by the arrowheads ; they are considered to pass through a magnet from the south pole to the north pole, leaving the magnet at its north pole and reentering the magnet at its south pole. We may think of each Page 75 closed loop as acting like a stretched rubber band in that it tends to shorten itself as much as possible ; and we may also look upon each line as having a repelling effect upon all neighboring lines, thereby tending to make the lines spread apart. Fig. 51 indicates the action of the lines of force when two Magnets tend to draw together. Unlike poles attract. (A) Fig. 51 Magnets tend to push apart. Like poles repel. (B) magnets are brought near each other, and illustrates how the behavior of the magnets can be explained in terms of the above attributes of the lines. When the adjacent poles of the two magnets are unlike, the relative directions of the lines from them are such that the two sets of lines combine to form a single set of closed loops, as shown in Fig. 51A ; and the tendency of these loops to shorten evinces itself in the mutual attraction between the unlike poles. On the other hand, when the adjacent poles are alike, as shown in Fig. 51B, the relative directions of the two sets of lines are seen to be such that the tendency of the lines to spread apart accounts for the repulsion between the like poles. The path which the flux takes is called the "magnetic circuit." The amount of flux or number of lines of force depends upon the opposition offered by the various materials making up the magnetic circuit. Iron forms a very easy path for the flux while air and copper form a difficult path. For this reason the Page 76 magnetic circuit of relays is so designed as to be mostly of iron, the air-gaps being made very short. This opposition which the magnetic circuit offers to the flux is called "reluctance." Reluctance contrQls the amount of flux in the magnetic circuit in a manner analogous to that in which resistance controls the amount of current in the electric circuit. It was stated above that we may look upon the lines of force as representing, not only the direction of the magnetic forces in the field, but the strength of the field as well. In considering the field strength aspect of this statement further, we shall again make use of an analogy. Where a stream of water is con� fined to a narrow channel the current is strong, but where the stream spreads out the current is weak. Just so with the magnetic circuit. It is an easily verified experimental fact that the magnetic force increases as we approach the poles of a magnet, and decreases as we recede from the poles. Likewise, as Fig. 52 we have seen in Figs. 49 and 50, and as is shown more clearly in Fig. 52, as we approach the poles of a magnet the flux density increases ; but as we move away from the poles the lines spread out in all direcPage 77 tions, and, of course, as the area over which they are spread becomes greater, the number of lines per square inch decreases. Thus field strength and flux density are seen to vary together-the greater the field strength the greater the flux density, and conversely. Hence, wherever the path of the flux is contracted to a small area, the flux density is reloatively high and the field is strong. Where the flux .spreads over a wide area, however, the flux density is, of course, relatively low and the field weak. The magnets we use in hand generators are designed to take advantage of the principles set forth in the previous paragraphs. Fig. 53A illustrates the "U" shaped magnets referred to. Compare this type of magnet with the bar magnet shown in Figs. 49 and 50, and note the shorter air path taken by the lines of force from one pole to the other as compared with that in the case of the bar magnet. If we fill the air space between the poles with iron-e.g., by placing (A) ( 8 ) Fig. 53 the pole pieces and armature of the hand generator between the magnet poles, as shown in Fig. 53Bwe further improve the magnetic circuit of the "U" Page 78 magnet. It is of interest to note that, by using a number of "U" bars placed side by side in the hand generator, the total amount of the flux through the armature is increased ; and this, by virtue of a property later described, enables the magneto to generate sufficient voltage to ring down the drops on the rural lines in our magneto switchboards, to ring subscriber bells, and to do other work for us. Care must be taken, however, that all like poles are placed side by side as shown in Fig. 54A ; otherwise the magnetic effect of one bar will neutralize the effect of another, as indicated in Fig. 54B. This would result in decreasing the number of lines of force passing through the armature, and the magneto would then not generate enough voltage for satisfactory service-in other words we would have a case of trouble. End view of magnets of End view of magnets of a 5-bar generator with a 5-bar generator with bars placed ..- bars placed "\1aliil8ttg. .. .. r .., t�/t (A) ,_; .p-/11( (B) I I .. .. I (;- Fig. 54 While discussing magnets it may be well to mention that in some cases, such as in the core of repeating coils, we have closed magnetic circuits of laminated iron. Here there are no poles set up .(see Fig. 55) ; but the lines of force, nevertheless, are Page 79 present in the core, and have a definite direction around it. � Fig. 55 ELEMENTARY PRINCIPLESDIRECT CURRENTS SECTION I-H ELECTROMAGNETS Page so ELECTROMAGNETS In Section I-G we discussed permanent magnets. We now come to a consideration of another type of magnet known as the electromagnet. Electromagnets are very common in telephone equipment. Field about a Straight Wire End View Fig. 56 Magnetism and electricity are so interrelated that magnetism can be created and controlled by an electric current. This enables us to make electricity perform a great deal of useful work. Wherever a current of electricity flows there is set up a magnetic field whose lines of force encircle the conductor which carries the current. "Fig. 56 depicts the magnetic field set up about a straight wire when an electric current flows through it. These lines of force are circular loops lying in planes at right angles to the wire. There is a definite relation between the direction of the current flow and the positive direction of the lines of force : if we grasp the wire in the right hand, the thumb pointing along the wire in the direction of the current, the fingers will then point around the wire in the direction of the lines of force. The relative directions of the current and of the lines of force, indicated by the arrowheads in Fig. 56, accord with the foregoing rule. The magnetic field set up about a single turn of wire when an electric current flows through it is Page 81 Fig. 57 shown in Fig. 57. We see that all lines of force encircle the wire in the direction stipulated by the rule just cited, and that all pass through the turn in the same direction. Fig. 58 shows what happens when we place a number of turns of wire together. The effects of the several turns combine to set up lines of Fig. 58 Cross Section Page 82 force, a very small proportion of which encircle the turns individually, but most of which link themselves through the whole group of turns. We immediately recognize the field represented by these lines to be similar to that set up by the bar magnet in Fig. 50, and we rightly conclude that, when current flows in it, the coil acquires the properties .of a magnet. The direction of the flux through the coil and the consequent polarity may be inferred, by the rule given above, from the direction in which the current flows around the coil ; but, for this purpose, the rule is more 00nvenient when restated in slightly different form. Place the right hand on the coil, the fingers pointing around the coil in the direction in which the current flows and the thumb extended parallel with the axis ; the thumb then points in the direction in which the lines of induction pass through the coil, i.e., towards the north pole of the coil. We have already seen how the current, the resistance, and the electromotive force (em�) in an electric circuit are related by Ohm's Law. IIi a magnetic circuit there is an analogous relation between the flux, the reluctance, and the force which sets up the flux, or "magnetomotive force" (mmf) as it is called-the flux equals the magnetomotive force divided by the reluctance. The magnetomotive force due to an electric current flowing around a coil is directly proportional both to the number of turns in the coil and to the number of amperes through them ; in other words, the mmf depends upon the number of amperes multiplied by the number of turns. Consequently, magnetomotive force � is commonly expressed in terms of "ampere-turns." The reluctance of a magnetic circuit in which the path of the flux is wholly through air or other non-magnetic substances, is a constant ; no matter how the mmf is varied, the Page 88 flux varies in like proportion. If, however, the path of the flux is partly or wholly through iron or other magnetic materials, the reluctance is not constant. Experiment shows that, if the mmf acting upon a magnetic substance be increased in a succession of equal steps, the corresponding increments in the resulting flux density eventually tend to become successively smaller-i.e., the reluctance increases-until a point is reached beyond which further increases in the acting ampere-turns produce practically no further increase in the flux density. When this condition exists the magnetic material is said to be "saturated," and the point at which saturation is reached is called the "saturation point." From what we have now learned we can see that the magnetic effect of a given current flowing through a coil can be increased in two ways : ( 1) by increasing the number of turns in the coil, thereby increasing the mmf ; and (2) by winfl.ing the coil on an iron core, thereby greatly reducing the reluctance of the magnetic circuit. A very strong magnet can, therefore, be obtained by passing a current through a coil of many turns wound on an iron core. Such magnets are called "electromagnets." The core of these magnets is usually made of a special soft iron or steel which has been carefully prepared and treated so that it will give up its magnetism as completely as possible immediately the energizing current ceases to flow through the winding. It should be borne in mind, however, that a small amount of magnetism, called "residual magnetism," is normally retained in the core of electromagnets. Fig. 59 shows a crude electromagnet made by winding a coil of wire about an iron nail. To demonstrate the action of the magnet, a piece of iron shaped like a relay armature is shown below the nail. When the key is closed curPage 84 Fig. 59 rent flows through the coil and the nail becomes a magnet having the power to attract the piece of iron as shown in Fig. 60 ; but when the circuit is opened the nail loses its magnetism, the piece of iron falls off, and we again have the condition shown in Fig. 59. Fig. 60 Our relays consist essentially of an electromagnet and an armature, together with such accessory parts Pa.ge 85 as contact springs, etc. By taking the coil just described and mounting it as indicated in Fig. 61, we can make a crude relay which will demonstrate the action of our standard relays. When the energizing '-==:l-ft j l--c======:=.--b Fig. 61 electric circuit is closed the current through the winding sets up a flux in the magnetic circuit, making the core a magnet. For a definite number of ampere turns the amount of flux set up depends upon the reluctance of the magnetic circuit. The greater part of the reluctance in the magnetic circuit of our relays is in the air-gap. If the current is in such a direction as to make the end of the core near the armature a north pole, the flux will pass from the core into the air-gap, cross the gap, enter the armature, and then pass through the iron part of the relay structure to the other end of the core and back to the starting point. The north pole at the end of the core adjacent the armature is, as we have already seen in Figs. 50, 51, 53 and 54, the region in which the flux passes from the core into the air-gap. Likewise, the region in which the flux passes from the air-gap into the armature is a south pole. These unlike poles will attract each other just as the north pole of one magnet will attract the south Page 86 pole of another ; hence, if the magnetic attraction is great enough, the armature will be pulleP. towards the core as Fig. 61 shows. Thus, through the agency of the magnetic effects which accompany it, the electric current is made to perform the work of moving the armature. If the current is reversed the effect will be the same, save that the armature will be the north pole and the end of th.e core adjacent the armature will be the south pole. When the armature pulls up the air-gap is shortened. This decreases the reluctance of the magnetic circuit, thereby causing the flux to be increased ; and since the magnetic attraction depends upon the amount of flux, the armature will be held up with a greater force than that which initiated its motion towards the core. Were the flux allowed to become too great the core might become saturated, a condition which would cause some relays to release too slowly. This condition may be prevented in several ways. Some relays have the cross-section of the magnetic material in the flux path greatly reduced for a portion of its length. The increase in reluctance which occurs when this constricted portion reaches saturation, prevents too high a flux density in the remainder of the magnetic circuit, no matter how closely the armature approaches the core. Other relays have stop pins of copper or German Silver which prevent the armature from striking the core. Still others have non-freezing discs. From our discussion of magnetomotive force it will be appreciated that determination of the proper number of ampere-turns is an important factor in relay design. The ampere-turns for a given relay are carefully figured out to meet the requirements imposed by the load to be put upon the relay, the length of the air-gap, the distance through which the Page 87 load must be operated, etc. Thi.. load may be a single heavy armature, or it may be a group or "pile-up" of springs whose tension has to be overcome. Fig. 62 shows the manner in which experimental methods may be employed to determine the number of ampere- turns needed to overcome known test loads applied to the relay at substantially the point on the Back Stop Screw armature at which the actual working load will come on the finished relay. From the results of these measurements can be determined the number of ampere- turns required to overcome the load which gravity, or the exact pile-up of springs to be used, will impose upon the armature of the relay whose design is being worked out. It should, therefore, be clear why we use current flow test sets in the field and why we adjust our relays to a given current flowthe very basis of the design is that the relay must get a proper amount of current in order to do its work. Where two windings are wound on the same core, care must be taken to insure that the magnetism produced by one winding is properly poled relative to the magnetism produced by the other. Whether � the currents in the two windings flow around the core in the same direction or in opposite directions, Page 88 will determine whether the magnetic effects of the two windings aid each other as indicated in Fig. 63A, or oppose one another as indicated in Fig. 63B. r..It l It l Armature is pulled up. Flux is strong. (A) Fig. 63 t Armature does not pull up. Flux is weak. (B) In some cases, such, for example, as the winding a referred to in discussing Fig. 16, it is required to obtain a non-magnetic winding, i.e., to wind a length of wire in the form of a coil without producing a magnetic effect. This can be done by arranging the wire, as indicated in Fig. 64A, so that the current flows in one direction around the core in passing through the turns made by one half the length of the wire, and in the opposite direction around the core in passing through the equal number of turns made by the other half of the wire. Since the direction of Coil wound non � inductively. .. Nail has no magnetism. .. (A) .. Fig. 64 Non . inductive Winding ]i;tft.n .. .. ( B) the magnetic field set up by each turn depends upon the direction of the current around the core, it can Page 89 be seen that the magnetic effects of the two equal and opposite sets of turns must oppose and neutralize each other. Such a coil is said to be wound noninductively. Fig. 64B indicates the arrangement of a relay which, like the relay in Fig. 16, has an energizing winding and a non-inductive winding connected in parallel. We frequently have use for special relays such as slow acting, polarized, and alternating current relays. The many slow acting relays in our dial system offices and the a-c relays in our four-party subsets are typical examples of two of these types. Polarized relays find considerable use in telegraph practice ; and we also find them in our telephone circuits, both in manual and in dial systems. Slow acting relays are designed so that the flux builds up slowly when the winding is energized and decays slowly when the current stops flowing through the winding of the relay. This condition is obtained by using a secondary short-circuited winding, which may be either a regular winding or a single turn of very low resistance. In some cases this winding takes the form of a copper tube around the full length of the core or around the core for a portion of its length ; in other cases it is a copper collar placed at one end of the core ; and in still other cases it is a closed coil. With any of these arrangements, when the circuit through the main winding is first closed and the magnetic field begins to build up, or when the circuit is first opened and the magnetic field. begins to die out, this increase or decrease in the main field "induces" in the closed secondary winding a voltage which causes a current to flow in it, just as the changing current through the primary winding of a transformer would cause a current to flow in a closed secondary circuit. This secondary Page 90 current tends, of course, to set up a magnetic field which, depending upon the direction of this current, will oppose or will aid the main field. The direction of this secondary current is always such that the secondary flux will be in whichever direction opposes the causative change in the main flux. Hence, ,when the circuit through the main winding is closed, the secondary flux opposes ( and so retards) the building up of the main flux, thereby delaying the instant at which the field becomes strong enough to pull up the armature. Likewise, when the circuit through the main winding is broken, the secondary flux opposes and slows down the dying off of the main flux, and consequently the release of the armature is delayed. Relays having this action delaying feature may be either slow operating or slow releasing, depending upon certain other factors of the design. If the winding for the relay is so chosen that the relay gets but little more than just enough current to operate it, the flux will not become strong enough to move the armature until the above effect of the shortcircuited secondary has been overcome and the flux has reached almost its full strength. We thus obtain a slow operating relay. To secure a slow releasing relay, the winding must be so chosen that the final value of the flux produced by the current through the relay is much greater than will permit release. In this case when the circuit is opened the flux will not decrease enough to allow the armature to fall back until the retarding effect of the short-circuited winding has been overcome. The polarized relay differs from the regular direct current types in that a permanent magnet is used in its construction in addition to the electromagnet. Relays of this type utilize two principles with which we have already become familiar. We know that Page 91 like poles repel and unlike poles attract, and we have also seen that the polarity of an electromagnet can be reversed by reversing the direction of the current energizing it. Consequently the fixed polarity permanent magnet and the controlled polarity electromagnet in the polarized relay can be made to repel or to attract one another at will. The polarized ringer described later also uses a permanent magnet and an electromagnet. Alternating current relays are of three general types. As will be shown later, an alternating current passes through zero value twice during each cycle, and at each such instant there is no current flowing to produce a magnetic force. The pull on the armature of an ordinary d-e type of relay would, therefore, come in spurts, and the relay would hum or chatter, if we attempted to operate it on alternating current. Prevention of this vibration or chatter is an important matter in the design of alternating current relays. One means employed to overcome this effect is to make the armature heavy enoug:ll that it will not fall back during the instants of nu- magnetic pull. This type of a-c relay is known as the inertia type ; it is used in some of the four-party subscriber sets. Two other general types make use of means by which, so long as the winding is excited, the magnetic pull on the armature is prevented from dropping to zero. In discussing Figs. 50 and 51 it was pointed out that lines of induction exhibit the property of exerting forces in an effort to shorten themselves and in an effort to spread apart. The operation of electric motors and of innumerable other electrical devicesincluding the D'Arsonval galvanometer and the Weston type meters whose uses were considered in Section I-E-depends upon the force set up by this Page 92 property of the lines of induction when, as represented in Fig. 65, the circular field produced by an (A) ( 8 ) Fig. 65 electric current flowing through a wire (see Fig. 56) is combined with the field produced by the poles of a magnet (see Fig. 54.A ) . Comparing Fig. 65 with Fig. 54.A, we note that the flux produced by the current strengthens the field above the wire and weakens it below, the result of this being that the lines above the wire are crowded together, and lines passing from one pole to the other are lengthened from straight lines into curves. Here the efforts of the lines to shorten and to spread apart will both tend to force the wire downward as indicated by the arrow in Fig. 65B. To illustrate this action we shall consider a specific application. Fig. 66 is a sketch of a crude meter . .A coil A-B is so mounted that it can rotate in the field between the poles N and S of a U-shaped permanent magnet . .Attached to the coil are flat spiral springs (see Fig. 29) which resemble the spring on the balance wheel of a watch. When no current flows through the coil, these springs maintain the coil in the position indicated in Fig. 66.A, with the pointer on the zero of the seale ; and they oppose rotation of the coil away from this zero position with a restoring force which Page 93 (B) Fig. 66 is proportional to the amount of rotation. Now suppose the current we desire to measure is led into the coil so that it goes in at B and out at A. The current in wire B strengthens the field above B and weakens the field below it, thereby forcing the wire B downward as indicated in Fig. 66B. Likewise the current in wire A strengthens the field below A and weakens it above, thereby forcing wire A upward. This action rotates the coil so that the needle swings across the scale. The arc through which it swings depends upon the strength of the field of the permanent magnet, and also upon that set up about wires A and B ; the latter, in turn, depends upon the amount of current flowing in the coil. Therefore, if the scale were calibrated in units of current, e.g., in milliamperes, we would have a milliammeter. Or, since the current through the coil would be proportional to the voltage across its terminals, the scale could be graduated in volts and the meter used as a voltmeter. . I Page 94 The part which magnetism plays in the operation of the telephone plant has been illustrated by brief descriptions of its use in relays, generators, and measuring instruments. Other important illustrations are to be found in the receiver and in the ringer. '--- -----ljti-+;... ____ --J Fig. 67 Fig. 67 shows the structure of a crude telephone receiver which embodies the same principles as the standard types. In front of a U-shaped permanent magnet about whose pole pieces are wound coils of wire, is mounted a thin, sheet iron diaphragm. The diaphragm moves in response to variations in the magnetic pull which, in turn, are controlled by the current flowing through the coils. The permanent magnet exerts a steady pull on the diaphragm. For the reason which will be explained in Section II-D this is necessary to make the receiver work properly. Fig. 68 is a sketch of a biased ringer. Here again we find the combination of a permanent magnet and an electromagnet. The permanent magnet M-N esPage 95 Fig. 68 tablishes two south poles S-S, one at the end of the core of each of the coils ; and, by induction, north poles N-N are set up at the ends of the armature, and a south pole S' is set up at its center. In other words, the armature, which is a piece of soft iron, has three poles, one in the center and one at each end, induced in it by the action of the permanent magnet. The biasing spring holds the armature in a fixed position. Now suppose an impulse of current flows through the coils in the direction indicated by the arrowheads. The magnetism set up by the current will strengthen the pole at the end of coil L, and will either weaken the strength of the pole at the end of coil R or reverse its polarity, depending upon the strength of the energizing current. The armature will, therefore, be attracted more strongly by the pole of coil L, and it will either be attracted less strongly or it will be repelled by the pole of coil R, with the result that the effect of the biasing spring will be overcome and the bell clapper will be moved to the opposite side and will strike the r gong. When the current stops flowing the magnetic relations in I .. I - I Page 96 the ringer will be reestablished as they -were prior to the impulse, and the biasing spring will pull the armature back to its original position thereby causing the clapper to strike gong 1. We can see that a series of impulses recurring in rapid succession will ring the bell for so long as they continue. Fig. 69 Now let us assume there are two ringers on one line, connected as indicated in Fig. 69. If a series of current impulses be sent from line to ground through both ringers as denoted by the arrowheads, the magnetic effects in ringer ( A ) will be seen to be exactly as just described, so that (A) will ring. In ringer ( B ) , ho..ever, the pole at the end of R becomes a stronger\wuth pole, and the pole at the end of L changes to north. Consequently these magnetic effects aid the biasing spring to hold the armature stationary, thus preventing ( B ) from ringing. ELEMENTARY PRINCIPLESDIRECT CURRENTS SECTION I-I ELECTROMAGNETIC INDUCTION Page 97 ELECTROMAGNETIC INDUCTION The Principle of Electromagnetic Induction We have seen that electricity and magnetism are very closely akin. In particular we have learned that, whenever an electric current flows in a conductor, a magnetic field is set up whose lines of induction are closed loops which link with the electric circuit in which the exciting current flows. That an electric current produces a magnetic field is an important principle, but is only one aspect of th.e relationship between electricity and magnetism ; equally important is the converse principle that a magnetic field can produce an electric current. In studying the latter principle it will be helpful to have it stated in two ways : ( 1 ) If a conductor in a magnetic field is so moved as to cut across the lines of induction, an emf is set up in the conductor. (2) If the number of lines of induction linked with an electric circuit be increased or decreased, an emf is set up in the circuit. The action by which emf's are thus generated is known as electromagnetic induction. Although the foregoing two statements of this action may appear superficially to differ somewhat, they are fundamentally equivalent in that both state that the emf generated is a result of a change in a magnetic field with respect to a conductor in the field. Voltages produced in this manner are called induced voltages, and the currents to which they give rise are called induced currents. An induced emf exists only while t..e change producing it is taking place. We shall shortly direct our attention to illustrations of the above two ways of stating the principle of electromagnetic induction. Before doing so, however, let us become acquainted with the rules relatPage 98 ing the magnitude and the direction of an induced emf to the change which generates it. We shall then be in a better position to understand without difficulty the points to be brought out in discussing the illustrations. The Magnitude of Induced Voltages The magnitude at any instant of an emf induced by a conductor moving across a magnetic field, depends upon the rate (number of lines per second) at which the conductor is cutting the lines of induction at that instant. Similarly, the magnitude of an emf induced by a change in the linkages between a magnetic field and an electric circuit depends upon the rate at which the number of linkages is changing. An emf of one volt is induced when lines are cut or linkages are changed at the rate of 100,000,000 per second. The Direction of Induced Voltages .An induced emf will, of course, tend to produce a current ; but unless the conductor in which the emf is induced forms part of a closed electric circuit, no induced current can flow. The direction of an induced emf is always such that, if the current which the emf tends to produce can flow, the magnetic field set up by this induced current (referred to in the remainder of this discussion as the secondary field) will be in the direction to oppose the change by which the emf is induced. This rule for determining the direction of induced, emf's will be easier to apply if restated in the following two ways corresponding to the two ways in which the principle of electromagnetic induction was stated above : ( 1 ) The direction of an emf induced by a moving conductor cutting the lines of a magnetic field, is such that the secondary field would be in the � I Page 99 direction for its reaction with the original field to oppose the motion of the conductor. (2) The direction of an emf induced by a change in the number of linkages between a magnetic field and an electric circuit, is such that the secondary field would be in the direction for it to tend to maintain the number of linkages unchanged. Induction by Motion We are now prepared to take up some illustrations of the principle of electromagnetic induction. The first of the two ways in which this principle was stated is illustrated in Fig. 70. A conductor AB is so located with respect to the poles N and S of a permanent magnet or electromagnet that by moving the conductor up or down it will cut across the lines of force. The ends of the conductor are connected to a galvanometer. When the conductor is moved G Fig. 70 downward or upward through the field a voltage is generated in the conductor, causing the galvanometer to deflect because of the induced current through it. From what we have already learned, we know that the direction along the conductor, of the Page 100 emf induced when the motion of the, conductor is upward, must be from A to B. This conclusion is reached by the following line of reasoning :-According to the rule for determining the direction of an induced emf, the secondary field in this case must be in the direction for its reaction with the original field to oppose the upward motion of the conductor. The force exerted upon the conductor by this reaction must, therefore, be downward. We know, however, that the circular lines of force set up by a current flowing through the conductor from A to B would, as in Fig. 65, strengthen the field above the conductor and weaken the field below it ; and this, as was explained in discussing Fig. 65, we know would exert a downward force upon the conductor. The direction of the emf induced by the upward motion of the conductor in Fig. 70 must, therefore, be from A to B along the conductor, thus impressing a voltage directed from B to A in the circuit connecting to the galvanometer. By sjmilar reasoning we also learn that the direction along the conductor, of the emf induced when the conductor is moved downward across the field, is from B to A. The polarity of the voltage generated when the conductor is moved downward is thus seen to be the opposite of that generated when the conductor is moved upward. With the galvanometer poled as indicated in Fig. 70, upward motion of the conductor would cause the needle to deflect to the right, and downward motion would cause a deflection to the left. The same effects as produced by moving the conductor across the stationary field can be obtained by holding the conductor stationary and moving the magnet up or down in such a manner that the lines of force will be cut by the conductor. In whichever manner the relative motion between II j Page 101 the conductor and the magnetic field occurs, however, it is particularly to be noted that the lines of force must be cut by the conductor ; if this motion is in a direction parallel with the lines of force no lines will be cut and there will be no voltage generated. The voltage of electrical generators is produced in the ma..ner just described. For example, in the hand generator (magneto) a coil of wire forming the armature winding rotates in the magnetic field set up by the U-shaped permanent magnets. This coil is the equivalent of many conductors connected in series ; and since each of these conductors cuts the magnetic field and thereby has a voltage induced in it, the result is similar to connecting a group of batteries in series. In discussing Fig. 54 the statement was made that if the strength of the magnetic field be cut down by improperly assembled or defective magnets, the voltage of the generator will be reduced. We can now see this would be true, because it would result in fewer lines of force being cut by the armature. We can also see why the speed at which the armature turns is an important consideration ; it is one of the factors which, by determining the number of lines cut per second, determine the voltage generated. The hand generator will be further explained in connection with the discussion of alternating currents in Section II-A. The aspect of the principle of electromagnetic induction presented by the first of the two statements of the principle, and discussed in the three preceding paragraphs, is of great practical importance because it enables us to convert mechanical energy into electrical energy. The second statement of the principle is likewise of extreme practical interest because the aspect which it presents affords lm explanation of certain important properties of electric circuits. We Page 102 shall need to have a clear understanding of these properties and shall, therefore, devote the remainder of this Section to a study of them. Self-Inductance We are all familiar with every-day examples of inertia. Take, for instance, a person seated in a car which has seats running lengthwise along its sides : when the car starts, his body sways away from the direction of the car's motion ; and when the car stops, he sways in the direction in which the car was going. This is because his body, due to its inertia, resists being set in motion from a state of rest, but once moving, it resists being stopped. Note, however, that inertia does not prevent a change of speed, but merely restricts the rate at which the change occurs. It is because of inertia that time is required to build up or to reduce the speed of a moving object. Electric circuits exhibit a property which is quite closely analogous to inertia. We call this property self-inductance. Let us see how self-inductance comes about and how it affects the behavior of circuits. From what we have already learned we know that the lines of force set up when a current flows through an electric circuit are closed � loops which link with the circuit, and that the number of these linkages will increase or decrease as the current increases or decreases. Consequently, according to the principle of electromagnetic induction, an emf will be induced in a circuit whenever the current in the circuit changes. The direction of any emf so induced can be determined by applying .the rule already stated : when a change in the current in a circuit causes a change in the number of magnetic flux linkages with that circuit, the emf thereby induced must be in the same direction as an induced current whose field Page 108 would tend to offset the clJ.ange in linkages. We can see, however, that to offset an increase in linkages the secondary field would have to link with the circuit in the reverse direction from the original field ; and that to offset a decrease in linkages the secondary field would have to link with the circuit in the same direction as the original field. It follows, therefore, that the increase in flux linkages accompanying an increase in current will induce an emf in the opposite direction from the current, and that the decrease in linkages accompanying a decrease in current will induce an emf in the same direction as the current. The foregoing may be summarized by saying that the change in magnetic flux linkages accompanying a change in the current in a circuit induces in that circuit an emf in the direction to oppose the change. To supplement this statement, we recall that the greater the change in the current and the more rapidly it occurs, the faster will be the rate at which the number of linkages changes, and hence the greater the induced emf will be. We must also remember that the induced emf exists only while the change producing it is taking place. One thing in particular stands out in the above discussion- the self-inductance of a circuit comes into play only during a change in the current. In directcurrent circuits this property has no effect upon the value arrived at when the current is changed from one steady value to another ; but, as we shall see in a moment, it does prevent the transition from occurring instantaneously. It is, therefore, as earlier stated, analogous to inertia. � For example, when a voltage is applied to a circuit, the emf induced by the flux linkages created while the current is being established, is in the opPage 104 posite direction from the current, so that part of the applied voltage is counteracted by this induced emf, and only the remainder is available to overcome the resistance of the circuit. Initially-the current and hence also the IR drop then being zero-the current starts to build up at a rapid enough rate to make the induced counter emf equal to the applied voltage. But as the current increases, thus increasing the portion of the applied voltage required to overcome the IR drop, the portion left over to further increase the current must decrease. The rate at which the current builds up towards the steady value I = EjR must, therefore, continuously diminish. Thus, during the establishment of a current, the self-inductance of a eircuit prevents the current from jumping instantly . to its steady value, but constrains it instead to require time to build up. On the other hand, when a circuit is opened the current is broken and the magnetic flux linkages die out, thereby inducing in the ..ircuit an emf which, we have learned, must be in the direction tending to maintain the current flow. This induced voltage is commonly high enough to force a flow of current to continue momentarily across the short initial length of the air-gap formed as the circuit is opened, thereby causing a spark at the point of break ; and in many circuits this voltage is so high as to necessitate protective measures to prevent destructive burning of contact points. Certain types of spark coils are designed to take practical advantage of this effect of self-inductance by utilizing it to obtain voltages high enough for various ignition purposes. We now know what self-inductance is-how it manifests itself. Let us next consider what factors determine the magnitude of this property of an electric circuit., Page 105 From what we have already learned we know that the greater the emf induced in a circuit when the current in it changes at a given rate, the greater is its self-inductance. Self-inductance is expressed in terms of a unit called the henry : by definition the self-inductance of a circuit in henrys equals the number of volts induced in the circuit when the current in it is changing at the rate of one ampere per second. This induced voltage, however, we know to be proportional to the change per second in the number of flux linkages. Consequently the self-inductance of a circuit is proportional to the change in the number of flux linkages, per ampere change in the current. Likewise, the self-inductance of any portion of a circuit is proportional to the change in the number of flux ltnkages with that portion, per ampere change in the current. e Fig. 71 In the case of the two straight wires comprising an open-wire pair the flux lines linking with the pair are only those which, as indicated in Fig. 7 1, pass between the two wires ; and each such flux line links with the circuit but once. The self-inductance of an open-wire pair is, therefore, quite small. And the. self-inductance of a cable pair is smaller still, because the two wires are separated only by the thickness of the insulation, and hence relatively fewer lines pass between the wires to link with the pair. Page 106 In the case of a coil of wire, however, the number of flux linkages, per line of induction threading the coil, depends upon the number of turns; and the number of these lines is directly dependent upon the number of turns ( which determines the magnetomotiveforce per ampere) , and inversely dependent upon the reluctance of the associated magnetic circuit. The change in the number of flux linkages per ampere change in the current, and hence also the self-inductance of a coil, is thus seen to have a twofold dependence upon number of turns and a reciprocal dependence upon reluctance. Where--as is quite closely approached in coils in which this is a design objective--the flux set up by each turn links all turns, the magnitude of the self-inductance of a coil is directly proportional to the square of the number of turns and is inversely proportional to the reluctance of the associated magnetic circuit. The selfinductance of relay windings, loading coils, retardation coils, etc., may, therefore, be made as high as required. As has already been noted, self-inductance comes into play only during a change in current. It then tends to retard the transition ; but, in direct-current circuits ( d-e circuits) , it has no effect upon the value arrived at when the current is changed from one steady value to another. Moreover, even where selfinductance is large, the interval during which its retarding effect causes the transition current in a d-e circuit to differ appreciably from the succeeding steady value is exceedingly brief. Ordinarily, therefore, in dealing with d-e circuits, we are not concerned with transition currents, but only with steady values ; and so we can ignore self-inductance. In alternating current circuits (a-c circuits) , however, the current is continuously changing, so that, as we L Page 107 shall find in Section II, self-inductance may be an important factor in determining the current under steady conditions. Mutual Inductance Every line of induction in the magnetic field set up by an electric current links at least once with the exciting circuit, and a portion of these lines, or even substantially all of them, may also link with other electric circuits. According to the principle of electromagnetic induction, a change in current will, therefore, not only induce an emf of self-induction in the exciting circuit, as we have just learned, but it will also induce an emf in any circuit which is magnetically linked with the exciting circuit. The property, by virtue of which a change in the current in either of two circuits induces an emf in the other, is called mutual inductance. This property, like selfinductance, is measured in henrys. The mutual inductance of two circuits, expressed in henrys, equals the number of volts induced in either circuit when the current in the other is changed at the rate of one ampere per second. The direction of an emf produced by mutual induction can readily be determined. As we shall see in a moment, the emf which a change in the current in either of two magnetically linked electric circuits induces in the other, is always in the same direction (relative to the linking magnetic circuit) as the emf of self-induction which the same change in current simultaneously induces in the exciting circuit. By saying that these two induced emf's are ip. the same direction relative to the linking magnetic circuit, we mean that the induced currents which these emf's tend to produce would both encircle the magnetic Page 108 circuit in the same direction. This, we know, must be true, because the rule governing the direction of all induced voltages tells us that the secondary fields of the emf's we are now considering are both required to be in the direction to oppose the change in the original magnetic field. Inasmuch, therefore, as we already know how to determine the direction of an emf induced by self-induction, we can also determine the direction of any emf produced by mutual induction. Fig. 72 Two coils arranged to demonstrate the action of mutual inductance are shown schematically in Fig. 72. These coils are insulated from each other and are wound on the same core so that, of the total flux set up by a current in either coil, the major portion links both coils (mutual flux), and only a minor portion merely links the excited . coil (leakage flux ). A relay with two inductive windings, and the two windings of a repeating coil, are familiar examples of such an arrangement. Across the terminals of one coil is placed a voltmeter, and the other coil is connected to a battery through a key. Let us examine into what happens when the k..y is closed and when it is later opened. Page 109 When the key is closed current starts to build up in coil A, flowing in the direction indicated by the arrowhead. As this current and the field produced by it build up, the rising total flux induces an emf of self-induction in coil A, and the rising mutual flux induces an emf in coil B. The emf of self-induction will, of course, be in the direction to oppose the building up of the current in A. Its direction around the core will, therefore, be opposite that in which the core would be encircled in traversing coil A in the direction pointed by the arrowhead in circuit A. Both the emf of self-induction in A and the emf of mutual induction in B will, therefore, be in the direction ( around the core) in which the core would be encircled in traversing coil B in the direction pointed by the arrowhead in circuit B. The current in B will also be in this direction. It is, of course, only while the current in A is building up that the induced emf in B exists. Hence, at the instant the key in Fig. 72 is closed, the meter will indicate a current in B which lasts but momentarily and then dies out. When the key in Fig. 72 is subsequently opened, the current in coil A is stopped and the field dies out. The decrease in linkages while the field is dying, again induces an emf in each of the coils. This time the emf of self-induction in A will be in the direction tending to keep the exciting current flowing. Its direction around the core will, therefore, be that in which the core would be encircled in traversing coil A in the direction pointed by the arrowhead in circuit A. The emf of mutual induction in B will be in this same direction ( around the core) , i.e., opposite the direction pointed by the arrowhead in circuit B. We shall, therefore, again note a momentary deflection of the meter, but in the opposite direction from Page 110 the deflection when the key was closed. Referring further to Fig. 72, we have now seen that, because of mutual inductance, changes of the current in coil A induce momentary emf's in coil B. These momentary induced voltages set up induced currents in B which, in ordinary circuits, also build up and die out quickly. As has already been implied, however, the mutual inductance of circuit A with respect to circuit B is the same as that of circuit B with respect to circuit A. The building up and the dying out of the momentary pulses of current induced in B will, therefore, in turn, induce emf's in A which affect the rate at which the current in A builds up when the switch is closed, and the rate at which it dies out when the switch is opened. This effect of mutual inductance in d-e circuits depends somewhat upon the nature of the circuit to which the secondary coil B is connected, and is far too complex for us to attempt to delve into in detail here. We can, however, quite easily get a useful picture of what is usually the predominant manifestation of this effect. A change in the current in A induces in B a current which, while it is building up, in turn induces in A an emf in the direction to aid ( speed up) the change of the current in A. This result of the current induced in B is seen to be partially to counteract the retarding action which, were coil B open circuited or not present, the self-inductance of A would exercise upon changes in the exciting current. Like self-inductance, mutual inductance has no effect upon the steady current values in circuits under d-e excitation, but is important in a-c circuits and will be studied further in Section II. Repeating coils, induction coils and various input transformers and output transformers, are familiar examples of Page 111 apparatus in the telephone plant, whose operation depends upon mutual inductance. For the purpose of bringing out more clearly a number of the ideas concerning mutual induction discussed in the preceding paragraphs, a group of experiments to demonstrate those points are outlined in Figs. 73 to 79. These experiments can easily be performed with the usual apparatus at hand in many of the offices. The apparatus required, the manner of connecting it and manipulating it, and the points to be observed in carrying out the various steps, are all indicated in detail by the schematics and by the legends below them. A v .. f--- X Pn. Sec. L...+ A.. Description:-Any two-winding relay and the api)aratus shown, to demonstrate the effects of mutual induction. At the start, with switch open, no current 11ows in either circuit. Fig. 73 v - - - When switch is closed armature pulls up. Momentary current 11ows in secondary in direction shown. Fig. 74 Page 112 v While switch remains closed armature stays operated and ammeter shows steady current 11.owing in primary, but there 1s no current in secondary. Fig. 75 v - :h - Pri. t Sec. t ! - 4- When switch is opened armature falls back. Momentary current 11.ows in secondary in direction shown. Fig. 76 v Pri. Sec:. Use a rheostat in primary circuit instead of switch. By varying current in primary a current can be induced in secondary. Note with little or no current change in primary there is no current in secondary. Fig. 77 I Sec. Pri. t v Page 113 - t - - Move rheostat to right and note current 1low in secondary in direction shown. When rheostat comes to rest at "0" note that current in secondary returns to zero. Fig. 78 v Pri. t .. - - - ,. + - t - Move rheostat to left and note current 1lows in secondary in direction shown. When rheostat comes to rest no current 1lows in secondary. Repeat the above experiments using a No. 20 induction coil in place of relay. Fig. 79 Bibliography Elements of Electricity Elementary Electricity and Magnetism . . . Practical Electricity . . . . Theory and Elements of . . . . . W. H. Timbie . . . . . . Jackson and Black . . . . . .T errell Croft Telephony . . . . . . . . . . . . . . . . . . . . .K empster B. Miller Lessons in Practical Electricity . . C. W. Swoope